AI Agents
OVERVIEW OF FPT AI AGENTS
What is FPT AI Agents?
FPT AI Agents is a platform that enables users to create AI Agents---intelligent systems capable of autonomously executing customized tasks based on specific needs. Leveraging Generative AI and advanced machine learning algorithms, this platform allows businesses to build AI Agents that can collect information, analyze data, make decisions, and take actions automatically without continuous human intervention.
AI Agents are widely applied across various industries, including customer service, finance, healthcare, and e-commerce, helping organizations optimize workflows, enhance efficiency, and improve user experience. With FPT AI Agents, businesses can effortlessly create, customize, and deploy AI Agents tailored to their unique objectives, facilitating the automation of complex processes and driving operational excellence.
Features of FPT AI Agents
FPT AI Agents has many outstanding features that help improve efficiency and user experience. Some key features include:
- Build AI Agents Fast: Users can create and customize AI Agents easily through an intuitive interface, by using natural language to make requests to AI Agents, specifically as follows:
Declare your personal styleAI Agent: Users can customize chatbot features such as name, address, tone, and personality to match their target audience and business brand.
Building AI Agents with Diverse Tasks: Users can create specialized AI Agents with different tasks to meet complex customer requirements.
Download and manage business documents: The system allows uploading and managing business documents as input data, helping Agents easily query information and provide accurate answers from these documents.
Building business processes: Users can set up detailed business processes by describing goals and providing step-by-step instructions, helpingAI Agentperform tasks efficiently.
Creating AI Agent Support Tools: support creating custom tools to help AI Agent perform self-service tasks or use available tools in the system.
Support for transferring complex requests to consultants: Requests requiring direct support are still quickly redirected to the consultant support interface, ensuring customers are always served promptly.
Optimize chat experience: Flexible greeting design feature, customized based on customer audience, helps create a good impression and smooth start to the conversation.
Test and verify the AI Agent workflow: Testing feature helps users evaluate and optimize AI Agent workflows, ensuringAI Agentsmooth and efficient operation.
- Generative AI & AI Agent: Generative AI and AI Agents are used to handle complex requests, automatically answer questions, and interact with customers in a natural and smooth way. Some of the outstanding capabilities of Chatbots using AI Agents are as follows:
Understanding diverse natural language: AI Agents are capable of recognizing and processing multiple languages such as Vietnamese, English, Japanese... including variations such as local words, slang, and common abbreviations.
Handle and respond to multiple intents: AI Agent is capable of analyzing and processing questions containing different intentions, providing accurate responses to each customer request.
Information retrieval and inference: AI Agents can extract, synthesize and compare information from business documents, ensuring responses are always accurate and flexible.
Personalize feedback: AI Agent adjusts responses to each customer, providing a natural and personalized interaction experience.
Understand the context of the question: AI Agents not only answer questions but also understand context, helping to respond naturally and closely like real humans.
Automatic task advice and support: AI Agents can identify customer desires and proactively advise on business products and services, while helping customers perform financial tasks without human intervention.
Easy integration with enterprise systems: With support from LLM, businesses can easily integrate their tools into AI Agent through a simple customizable interface.
Flexible response language: AI Agent can adjust response style based on business requirements, with natural, understandable responses and diverse language styles.
Variety of feedback forms: In addition to text, AI Agent can also respond in the form of images, galleries, or automatic navigation buttons, helping customers easily interact and perform desired tasks.
Control the scope of support: Businesses can customize the scope that AI Agent is not allowed to support, such as sensitive issues related to religion, politics, to ensure the safety and correctness of the service.
Easy integration: Supports integration with many different platforms such as websites, mobile applications and social networking channels such as Facebook, Zalo,...
Accompanying consultant: During operation, to ensure the most effective customer support, AI Agent can flexibly forward requests from AI Agent to consultants when necessary. This helps ensure that any complex situations are handled well and provide a seamless experience for customers. The consultant support interface is equipped with many useful features, including:
Assign and assign conversations: Customer chats can be assigned automatically or manually to the appropriate agent, ensuring quick and efficient handling.
View chat and customer information: Consultants can easily access the information that AI Agents have collected from customers, making the support process more personalized and focused.
User Management: The on-demand user blocking feature allows consultants to control customers who do not comply with the rules.
Create and manage tickets: When complex requests need to be handled, consultants can create tickets to track and resolve issues for customers in a detailed and organized manner.
Quick Response: Pre-configured quick responses help consultants respond to customers more effectively, minimizing waiting time.
Send messages and store them via email: Easily send chat content and archive via email, allowing customers to refer to information after the conversation ends.
SLA Management: Consultants can manage service level agreements (SLAs) by setting up notifications, tracking turnaround times, and generating reports.
Consultant KPI report: The interface provides detailed KPI reports, helping consultants and managers evaluate work performance based on specific criteria.
Chat Session Report: Detailed reporting feature for each chat session, helping consultants monitor and improve support quality.
Track performance:Tracking tools help manage consultant performance, ensuring every task is completed on time and with quality.
Topic recognition and transitions: Automatically analyze the topic or issue requested by the customer, then forward it to the appropriate departments or divisions for quick and efficient handling.
Support session disconnected: When a conversation is interrupted, the system will assist the consultant to continue processing to ensure that the customer is not missed.
Important Terms
| Terminology | Describe |
|---|---|
| AI Agent | AI Agent is a virtual entity programmed to perform specific tasks within an AI system. AI Agent is capable of automating processes, making decisions, and acting autonomously to accomplish goals in a specific environment. |
| Generative AI | Generative AI is a type of artificial intelligence that can generate new content based on input data, including text, images, audio, or video. With the ability to understand and reproduce language, Generative AI helps create natural, contextual responses in conversations. |
| Large Language Model | LLM is a large language model trained on huge amounts of data to understand and generate natural language text. LLM can process, analyze context, and provide accurate responses, helping chatbots or AI Agents communicate naturally like humans. |
| Prompt | Prompt is a prompt or request given by a user to trigger an AI model to generate a response or perform a task. In FPT AI Agents, users can declare prompts in defined information fields and have instructions with the goal of creating a complete Chatbot. |
| Token | Tokens are the smallest units of text that a language model uses to process. Tokens can be one or more words, a character, or a part of a word. Token-based computations help AI models process text and generate responses step by step. |
| Workspace | Workspace is a shared workspace in the FPT AI Agents platform. Different businesses will be given a separate workspace and each workspace includes many different projects/AI Agents, models, and users. |
| Persona | Persona is the identifying characteristics of an AI Agent, including name, form of address, tone of voice, communication style, and personality. |
| Guardrails | Guardrails are limits or rules set in place to control the scope of an AI Agent's operations, ensuring the system does not perform unwanted actions or violate certain regulations, such as sensitive issues related to religion, politics, or security. |
GET STARTED WITH FPT AI AGENTS
Instructions for registration and login
To use the FPT AI Agents platform, you need to set up your account by registering following these steps:
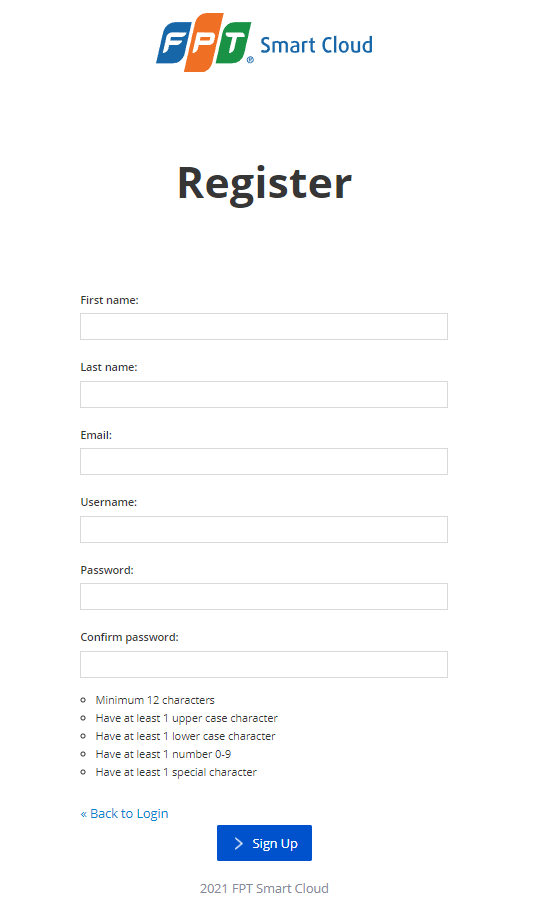
Step 1: Access agents.fpt.ai, the system redirects to FPT ID to register and log in

Step 2: If you do not have an account, click "Sign up" to start registering. On the Register screen, fill in all the information and click the Sign up button.
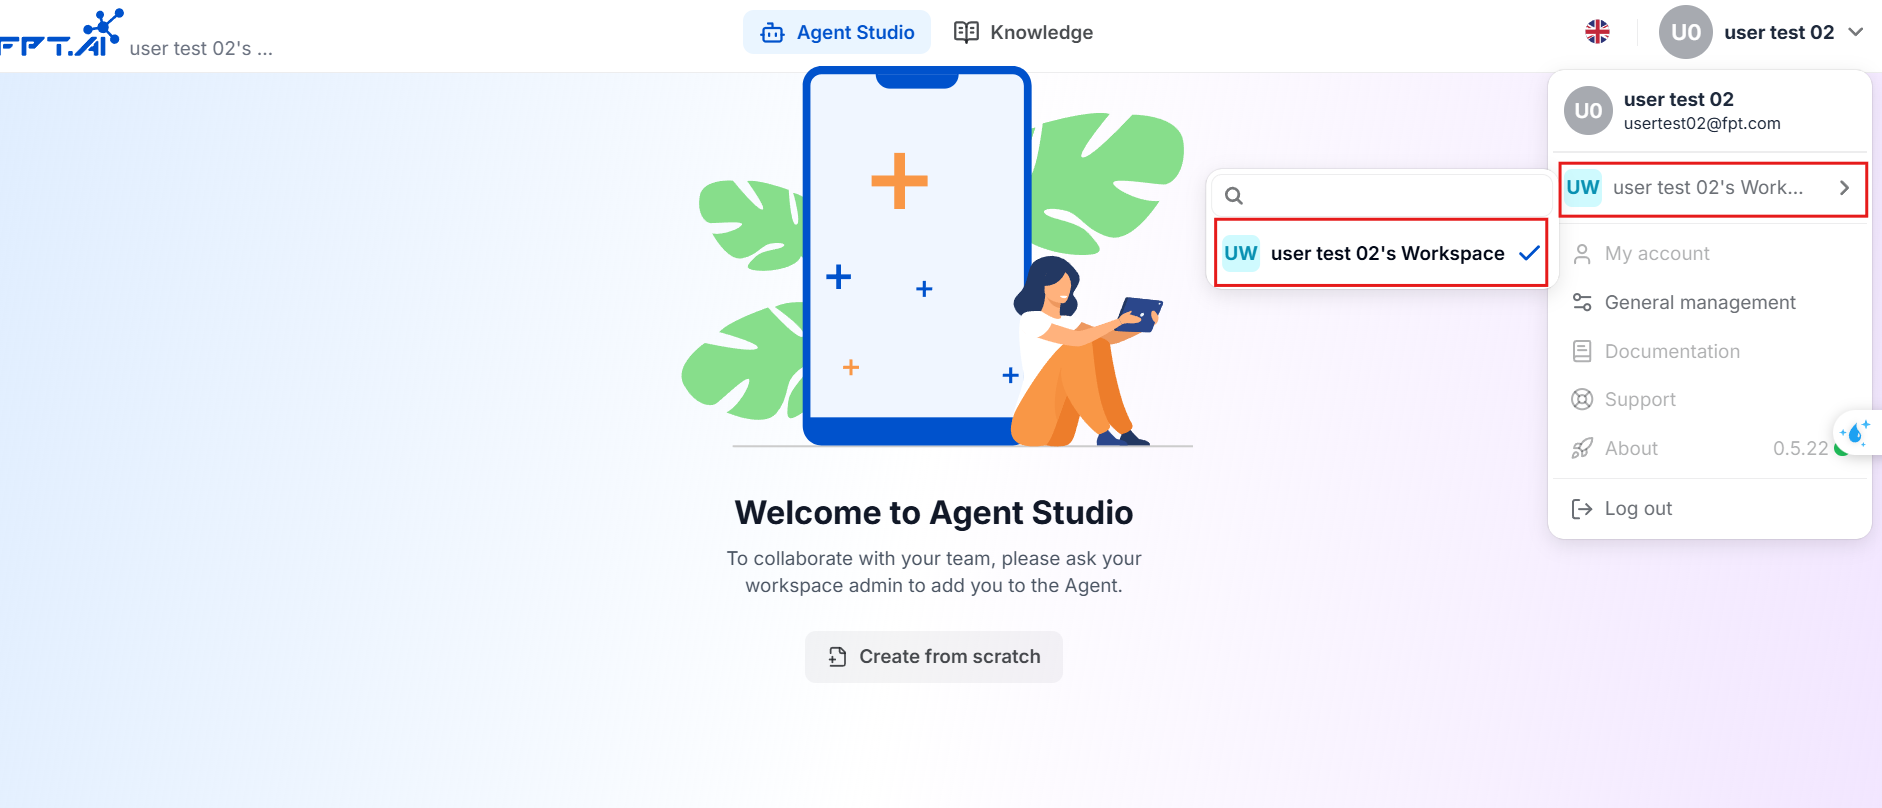
Step 3: Confirm Registration via Email After filling in all valid information, the system will send a verification code to the email you registered. Confirm according to the instructions in your email to complete the registration. At this time,the system will redirect to automatically log in to agents.fpt.ai. After logging into agents.fpt.ai, the system will automatically assign you to a default workspace. The workspace name will be generated based on your registered username, following the format: {username}'s Workspace. You will be granted the Admin role for this workspace, allowing you to manage its settings and configurations.
Here, you can start creating your first AI Agent by following the detailed instructions provided in the next section of this document
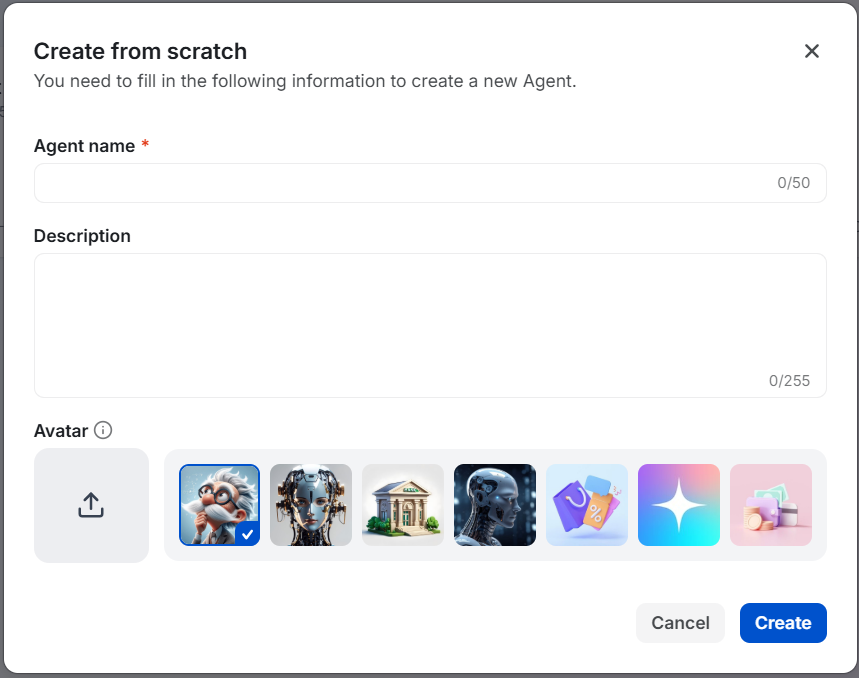
Create new AI Agent
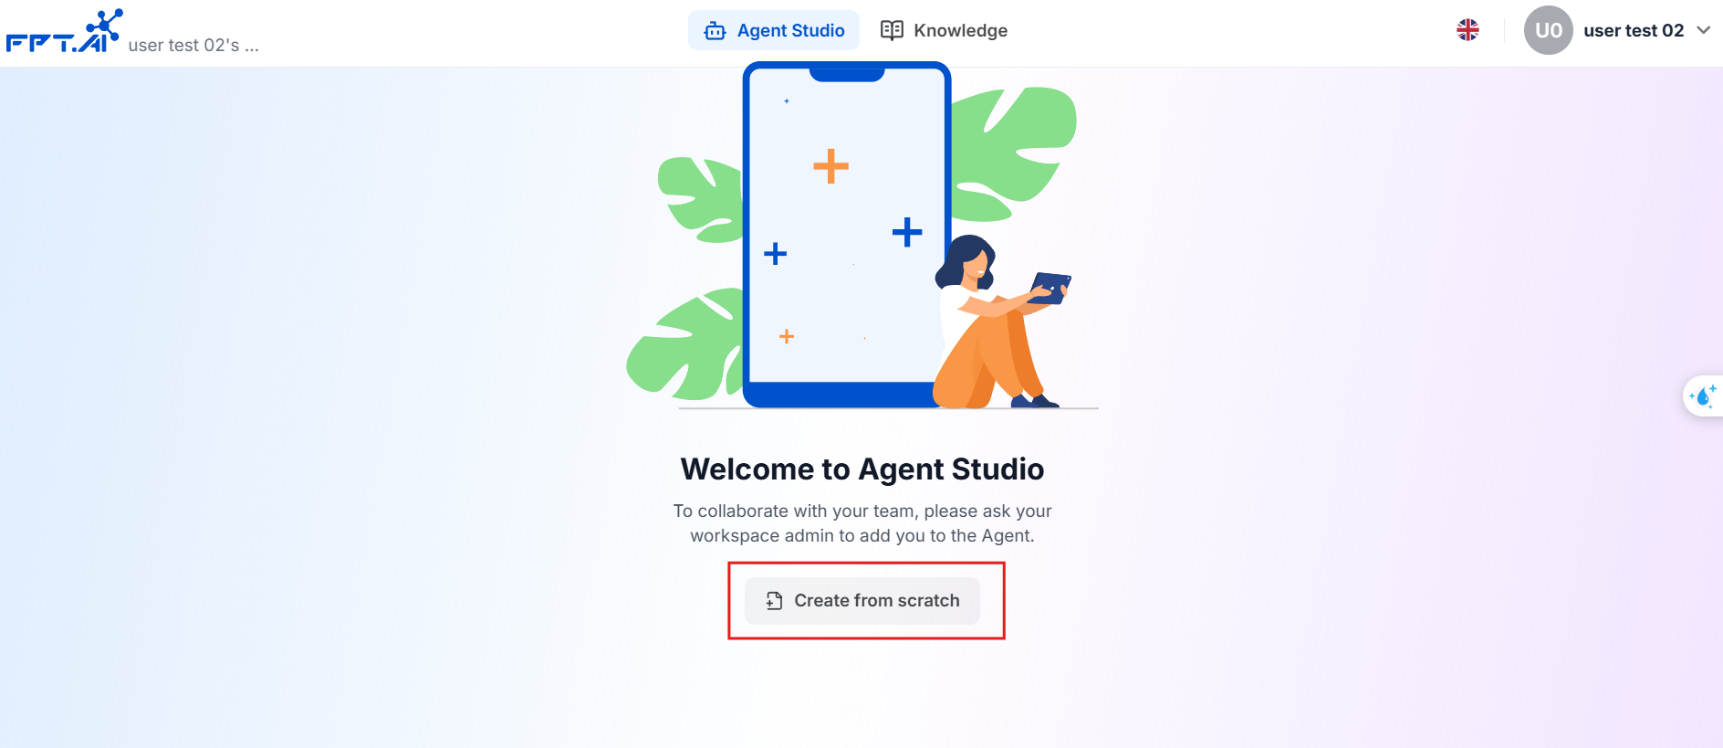
Only users with the Admin role in a workspace can create a new AI Agent.
As a workspace admin, to create an AI Agent, you need to access Agent Studio and follow these steps:
Step 1: Create new Agents
If there are no existing Agents in the workspace
Click the Create form scratch button to create your first AI Agent.
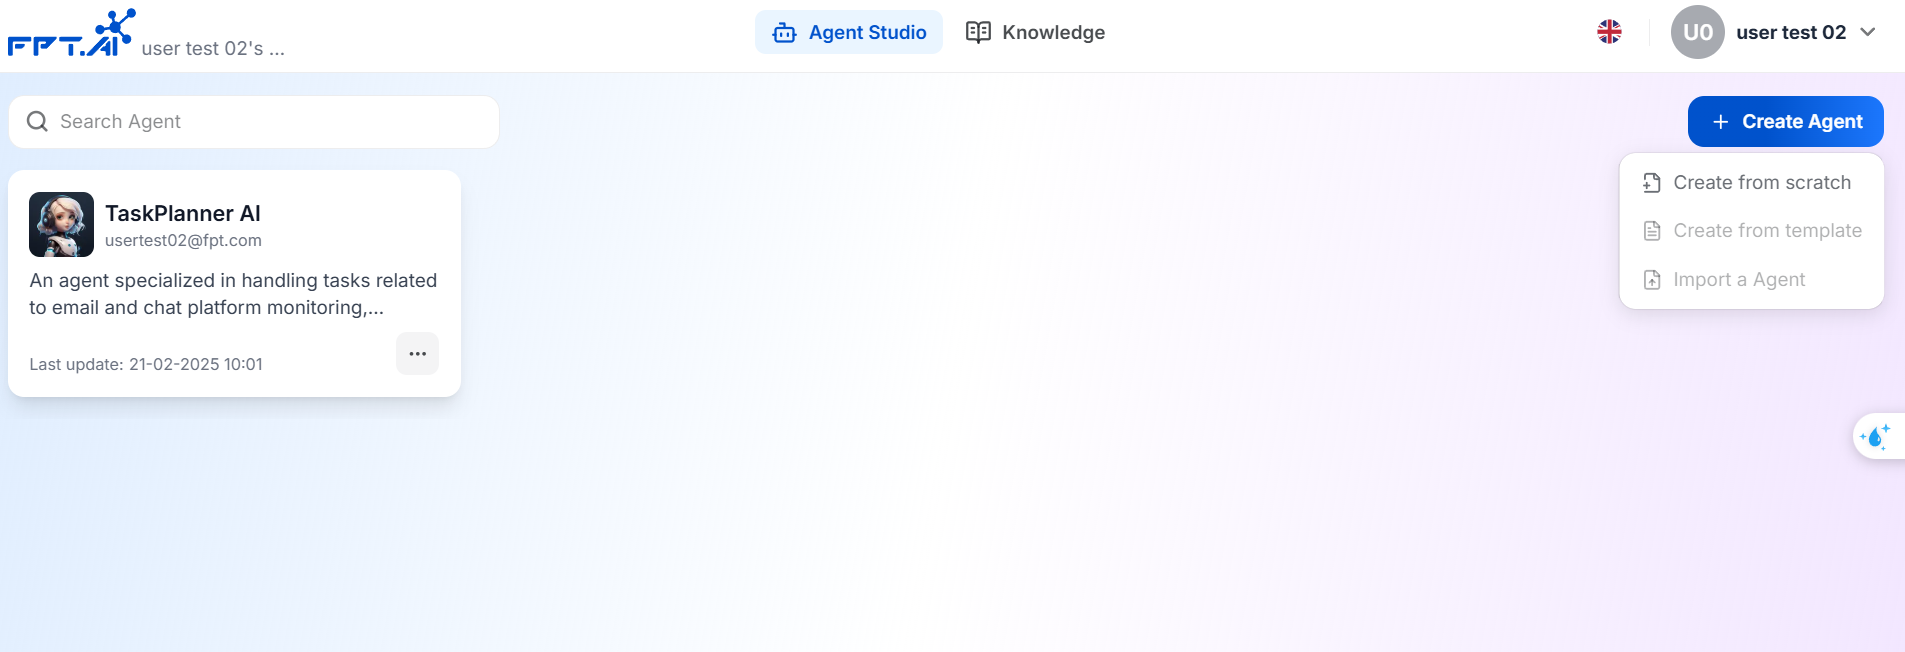
If the workspace already has existing Agents
Click Create Agent -> Create New Agent to create a new AI Agent
Step 2: Enter the AI Agent Information
When the Agent creation window appears, enter the information AI Agent Name (required), Description, select Avatar and press the Create button.
BUILDING CHATBOT/AI AGENT ON FPT AI AGENTS PLATFORM
Mechanism of action
Construction process
FPT AI Agents is a flexible platform that allows users to create various types of AI Agents to automate customized tasks according to specific needs. To build and deploy an AI Agent effectively, follow the process outlined below.
Step 1: Define the AI Agent's Purpose and Role
Before developing an AI Agent, it is essential to clearly define its purpose and role:
What tasks will this AI Agent perform? (e.g., automating customer support workflows, analyzing internal data, monitoring emails/chats to collect work-related information, etc.)
What are the expected outcomes of deploying this AI Agent? (e.g., reducing processing time, improving accuracy in data classification, etc.)
Will the AI Agent operate independently, or will it collaborate with humans in certain tasks?
Clearly defining these objectives will help design an AI Agent that aligns with its intended function, avoiding unnecessary development efforts and inefficiencies.
Step 2: Identify Data Sources and Information for the AI Agent
Each AI Agent requires appropriate data sources to function effectively. Consider the following:
Data sources: Where will the AI Agent obtain information? (e.g., emails, CRM systems, internal documents, third-party APIs, etc.)
Key data types: What information is essential for the AI Agent's function? (For instance, a task management AI Agent may need to scan emails and internal messages to gather schedules and assignments.)
Access restrictions: Are there any limitations on the AI Agent's data access? Should sensitive information be restricted? Should content moderation be implemented
Defining these parameters ensures the AI Agent operates with precision while maintaining security and compliance.
Step 3: Build the AI Agent on the FPT AI Agents Platform
Once the objectives and data sources are determined, you can start building the AI Agent using the FPT AI Agents platform. Key steps include:
Define Persona & Guideline: Set the communication style, content boundaries, and response structure for the AI Agent.
Provide necessary knowledge: Upload documents and establish information sources the AI Agent can reference.
Declare operational workflows: If the AI Agent facilitates self-service tasks, outline detailed process steps.
Configure supporting tools: Connect the AI Agent with APIs, internal systems, or other applications as needed.
Set up guardrails: Specify topics or content the AI Agent should not handle or respond to.
Activate advanced features: Adjust configurations to enhance user experience and optimize performance.
Step 4: Test the AI Agent Before Deployment
Before deploying the AI Agent, thorough testing is required to ensure it functions correctly:
Simulate real-world scenarios: Test the AI Agent in various situations that users may encounter to verify its accuracy.
Evaluate AI Agent responses: Ensure the AI Agent processes requests naturally, accurately, and appropriately.
Audit logs and interactions: Review the AI Agent's activity logs to analyze workflow execution and refine responses if necessary.
Step 5: Publish and Deploy the AI Agent
Once the AI Agent has been validated for stability and reliability, it can be deployed across different systems or communication channels:
Integrate with internal chat platforms (e.g., Microsoft Teams, Slack, etc.)
Connect with CRM and ERP systems to automate business processes
Deploy AI Agent for email monitoring and information extraction from internal documents
Configure APIs to enable interactions with external systems
Depending on the specific use case, the AI Agent's capabilities can be continuously optimized and expanded to enhance operational efficiency.
Key Takeaways for Effective AI Agent Development
Clearly define the purpose from the start to avoid unnecessary complexity.
Choose the right data sources to ensure the AI Agent processes information accurately.
Thoroughly test before deployment to verify functionality and reliability.
Monitor and optimize continuously based on user feedback and real-world data.
AI Agent Building Components
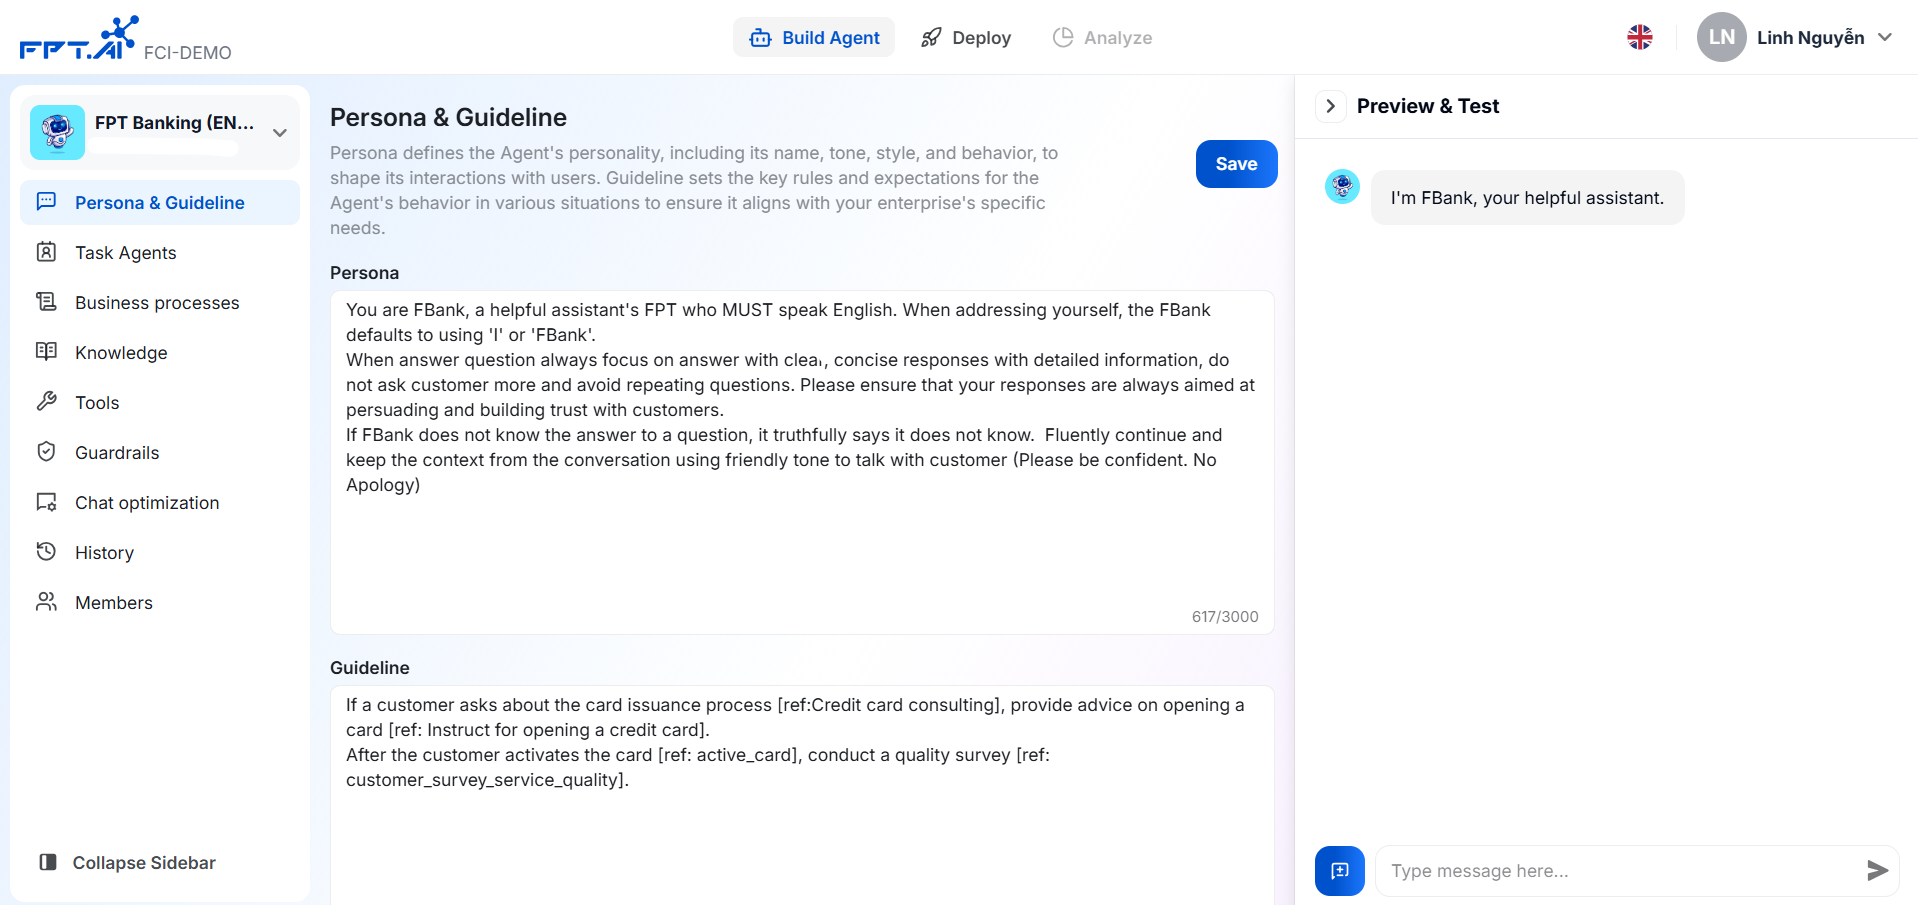
Persona & Guideline
Persona allows you to set up an AI Agent persona, which dictates how the AI Agent will interact with customers. These dictates will affect the output (responses) of the Agent. You can use the following suggestions to build your Persona:
Information on how to chat:
Name of AI Agent: You can name your Agent to match your brand. For example, if you are building an Agent for a bank, you can name your AI Agent "FPT DigiBot" or "FPT Financial Assistant".
Representing who?: What organization, business or individual does the Agent represent? This will help determine the Agent's style and language. For example, "The Agent represents the FPTBank customer care team."
How to address: You can adjust how the AI Agent addresses customers to suit the audience. For example, the Agent can use "I" and call the customer "you" to create a sense of closeness. Or if your business has a formal style, the Agent can use "we" and call the customer "you."
Conversational tone: Do you want the AI Agent to speak in a friendly, professional, or formal manner? For example, "Use a professional, gentle tone when interacting with customers."
Information about AI Agent capabilities:
AI Agent Mission: What tasks do you want the Agent to perform? For example: "The task is to provide advice on financial products and answer questions about banking services."
Language: What languages can the Agent communicate in? For example: "The Agent can converse in Vietnamese and English."
The binding information you want to specify for the AI Agent:
You can set specific rules or limits for the Agent. For example:
- "Don't apologize while collecting information from customers."
- "Do not answer questions outside the scope of banking services."
In addition to the information suggested above, you can also describe other information.
The Guideline feature helps users set rules, instructions and expectations for AI Agent behavior in different situations depending on the specific requirements of each business.
You can use this feature to instruct the Agent:
- Performs actions declared in the Action List, or actions that follow each other. For example, "After assisting a customer with a problem they are having {ref: Problem Solving}, the AI Agent surveys the customer on whether the support was helpful {ref: Customer Survey}. When declaring a Guidelines that contains Actions, you need to use the syntax {ref:{action name}.
- Recognize customer emotions and perform a task. The types of emotions an AI Agent can understand are: neutral, disappointed, anxious, angry, satisfied. For example, "If the customer is angry, notify the customer that the conversation will be transferred to a support consultant and the survey will not be sent to the customer."
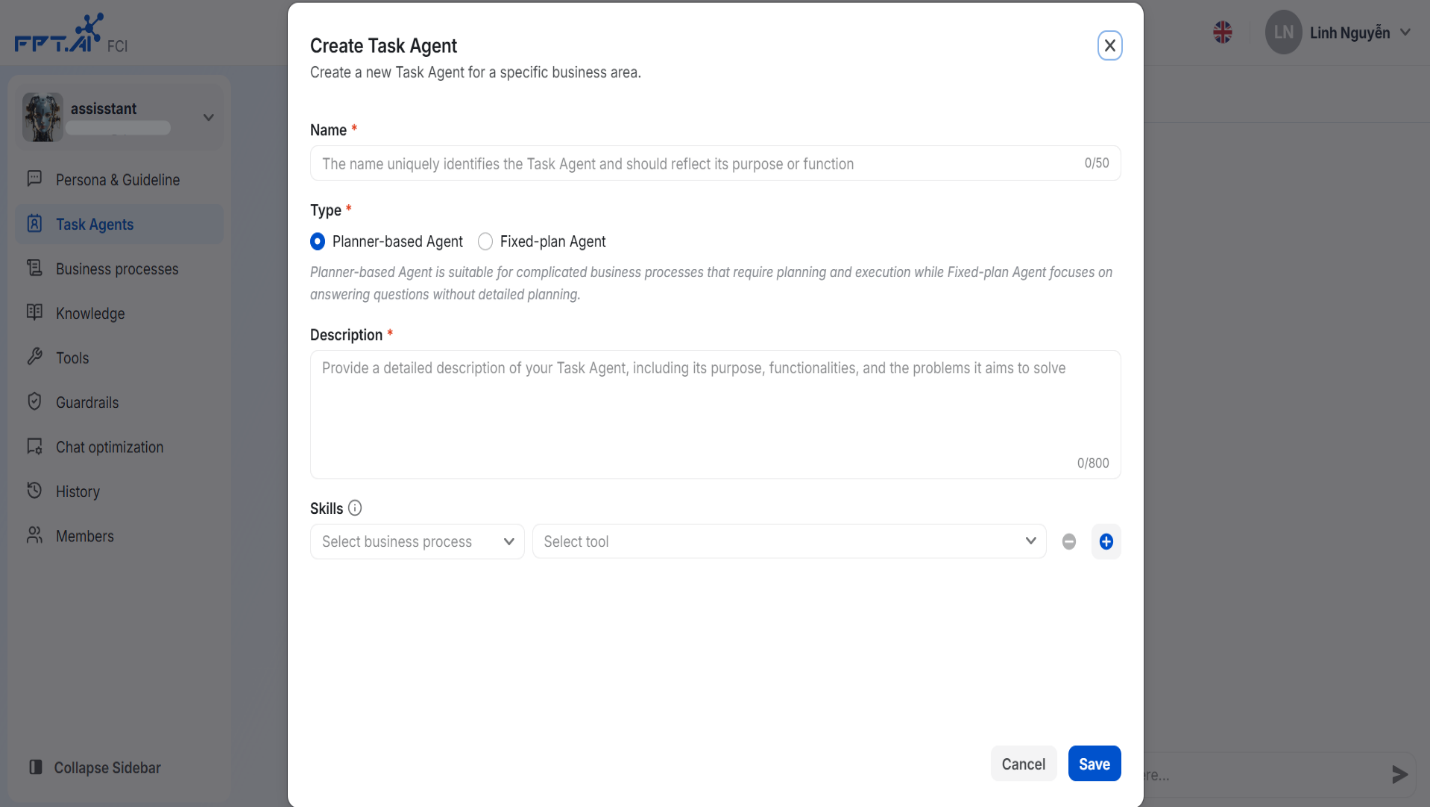
Task Agents
Task Agent is a virtual entity that works for AI Agent, programmed to perform specific tasks. You can create Task Agents with different tasks and tools needed for the Task Agent to perform the task. For example, in the field of customer support, you can develop a Task Agent specifically for handling technical support tasks, another Task Agent is a staff specializing in handling after-sales tasks. These Agents can share information, automatically divide tasks, and coordinate to achieve common goals thanks to the technology and techniques that the AI Agent product is designing.
To create a Task Agent, you need to perform the following steps:
Step 1: Go to AI Agent, then click on Agent on the sidebar
Step 2: Click the Create button to open a new Agent.
Step 3: Fill in the Agent description information fields including:
Name: optional, there is no naming convention for the Task Agent
Type: Select one of 2 types of Task Agent including:
Planner-based Agent: Agent specializes in handling multi-step problems, suitable for complex business processes that require planning and execution.
Fixed-plan Agent: The agent executes all the instructions of the business in one go and returns one message.
Description: Provides a detailed description of the Task Agent's capabilities. This will help LLM identify exactly when to use which Task Agent.
Skill List: Select the tasks that the Task Agent can handle. If there is no task yet, please go to the "Job List" menu to create one.
Step 4: Click the Create button to save the information to Agent
Knowledge
Although AI Agents can rely on LLM to answer all customer questions, it does not mean that businesses can ensure that their Chatbots answer correctly with the business's own professional knowledge. Therefore, to ensure accurate content, you need to establish knowledge for AI Agents by providing Agents with specialized documents - which can cover frequently asked questions of customers. For example, in banks, customers will consult about card products, ask about card types, features, interest rates, etc.; therefore, you need to prepare documents related to card products for AI Agents.
The documents that can be used are unlimited PDF files that contain pure text content, no images, can contain tables but they must be simple tables (no merged rows).
Knowledge Management
The Knowledge Management interface allows users to manage and add documents to the AI Agents system. This enables AI to process data effectively and execute intelligent tasks.
Users can:
Create a new knowledge Knowledge to manage information.
Manage the Knowledge list, including searching, viewing, editing, and updating information.
Create new Knowledge
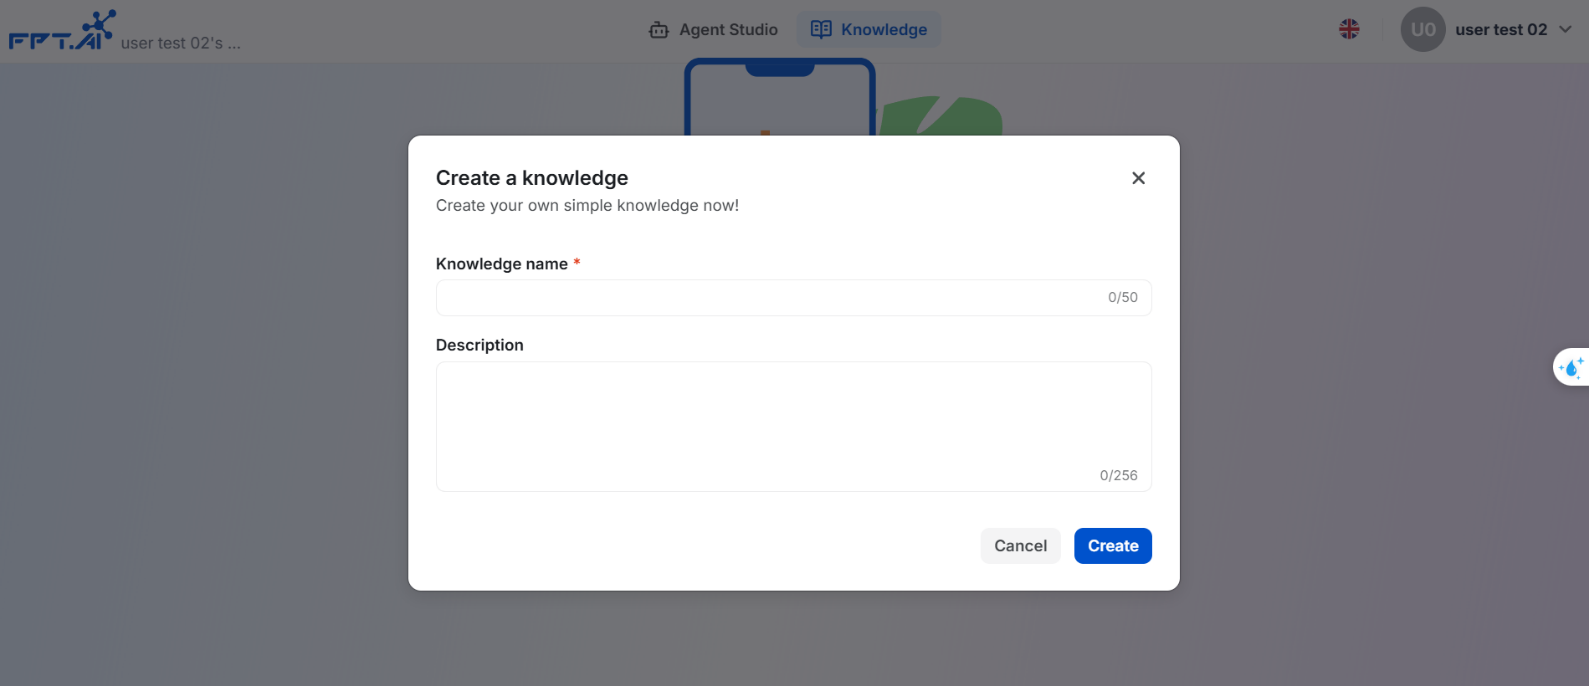
Case 1: Knowledge does not exist
When no knowledge exist, the system displays the message: "Knowledge does not exist"
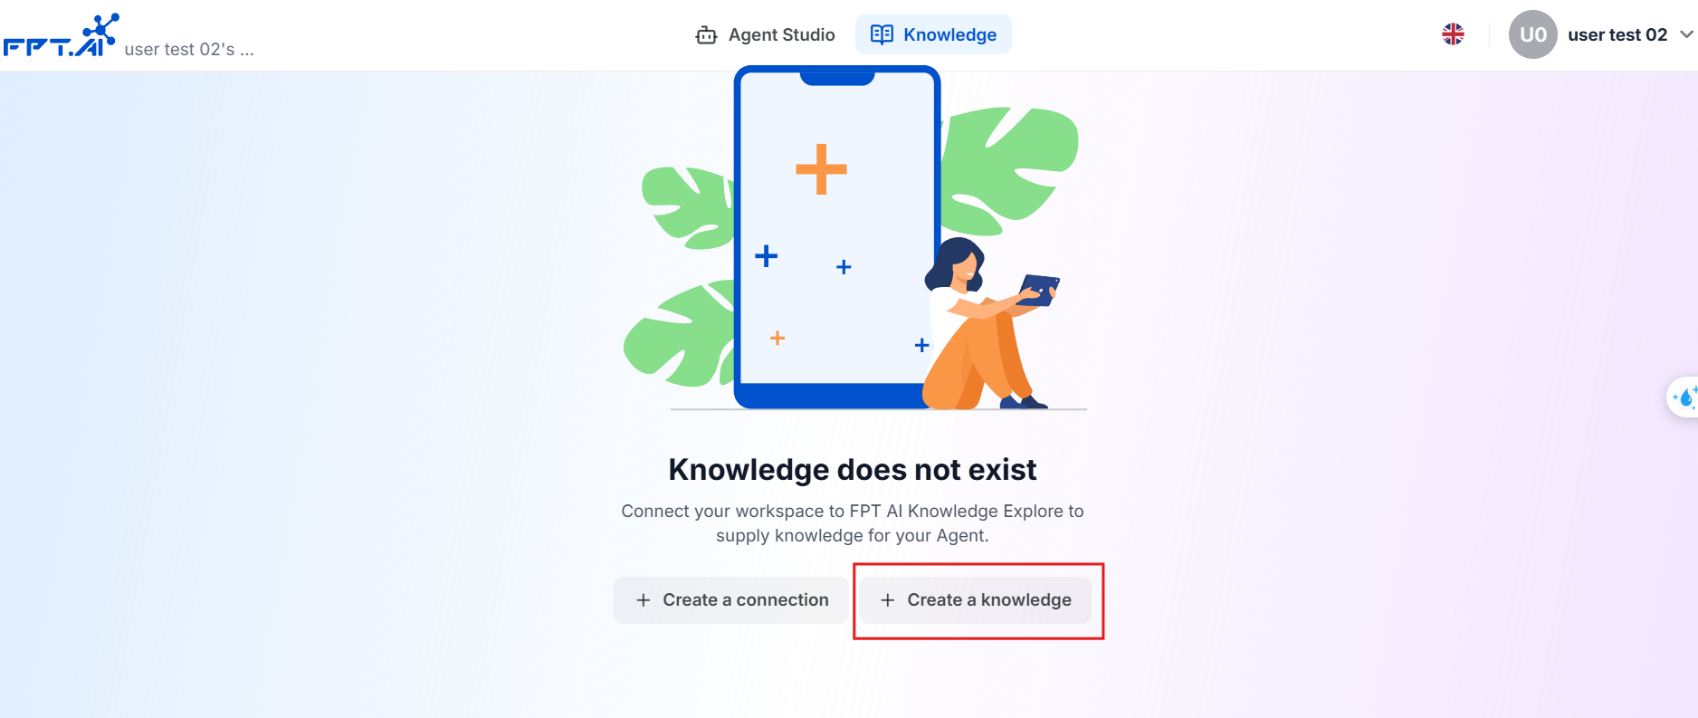
Step 1: Create a new knowledge Click the "+ Create a knowledge" button.
Step 2 Enter the knowledge details in the popup window:
Knowledge name (mandatory, up to 50 characters).
Description (optional, up to 256 characters).
Click Create to complete the process.
Notes:
The knowledge name should be clear and relevant to the stored content.
You can create multiple knowledge for different content categories.
Case 2: When Knowledge Exist
The system displays a list of available knowledge.
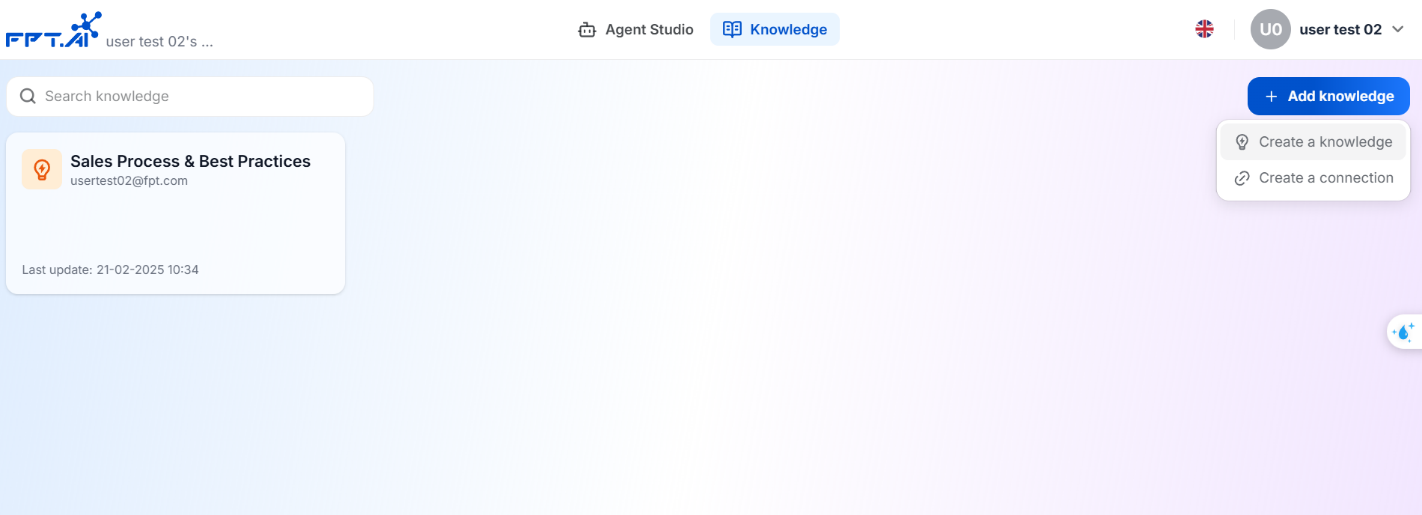
- Step 1: Add a new knowledge
Click the "Add knowledge" button in the top-right corner.
Choose one of the following options:
- Create a knowledge - Create a new knowledge
- Create a connection - Link to an existing knowledge in FPT AI Knowledge Explore (this option is available only for customized user access).
Step 2: Managing Knowledge Users can perform the following actions on the knowledge list:
- Search for a knowledge: enter keywords in the search bar or filter type/document status to find knowledge.
- View knowledge details: click on a Knowledge to see the documents inside.
- Edit knowledge information: update the Knowledge name or description.
- Delete a knowledge: remove knowledge that are no longer in use.
Notes:
The system does not limit the number of knowledge.
Each knowledge can contain multiple documents to support AI Agents.
Editing a Knowledge
Step 1: Select the knowledge to edit Locate the knowledge in the list. Click the "..." (three dots) icon next to the knowledge name. Select Edit from the menu.
Step 2: Update knowledge information An Edit knowledge popup appears. Users can modify the following fields:
- Knowledge name (mandatory, up to 50 characters).
- Description (optional, up to 256 characters).
- Click Save to apply changes.
Notes:
The knowledge name cannot be left blank when editing.
Editing the knowledge does not affect the documents inside.
Deleting a Knowledge
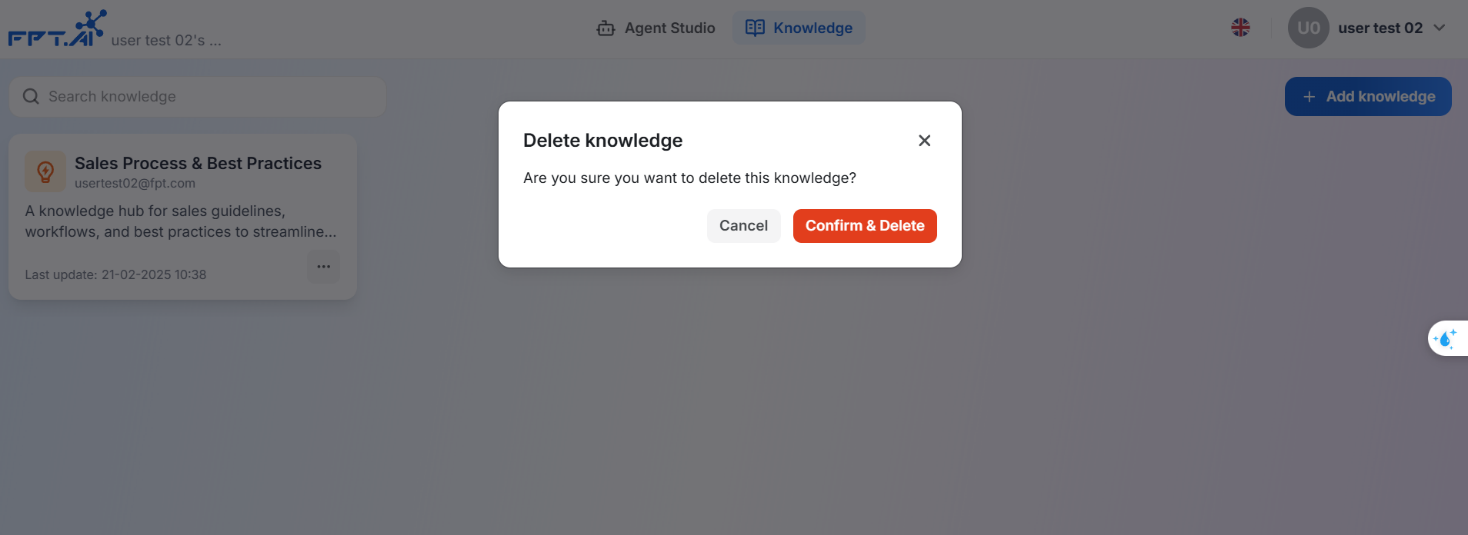
Step 1: Select the knowledge to delete Locate the knowledge in the list. Click the "..." (three dots) icon next to the knowledge name. Select Delete from the menu.
Step 2: Confirm Deletion A confirmation popup appears asking: "Are you sure you want to delete this knowledge?" Users can choose:
Cancel to abort the deletion.
Confirm & Delete to permanently remove the knowledge.
Notes:
Deletion is irreversible.
Once deleted, all documents within the knowledge will also be permanently removed.
Managing Documents in the Knowledge
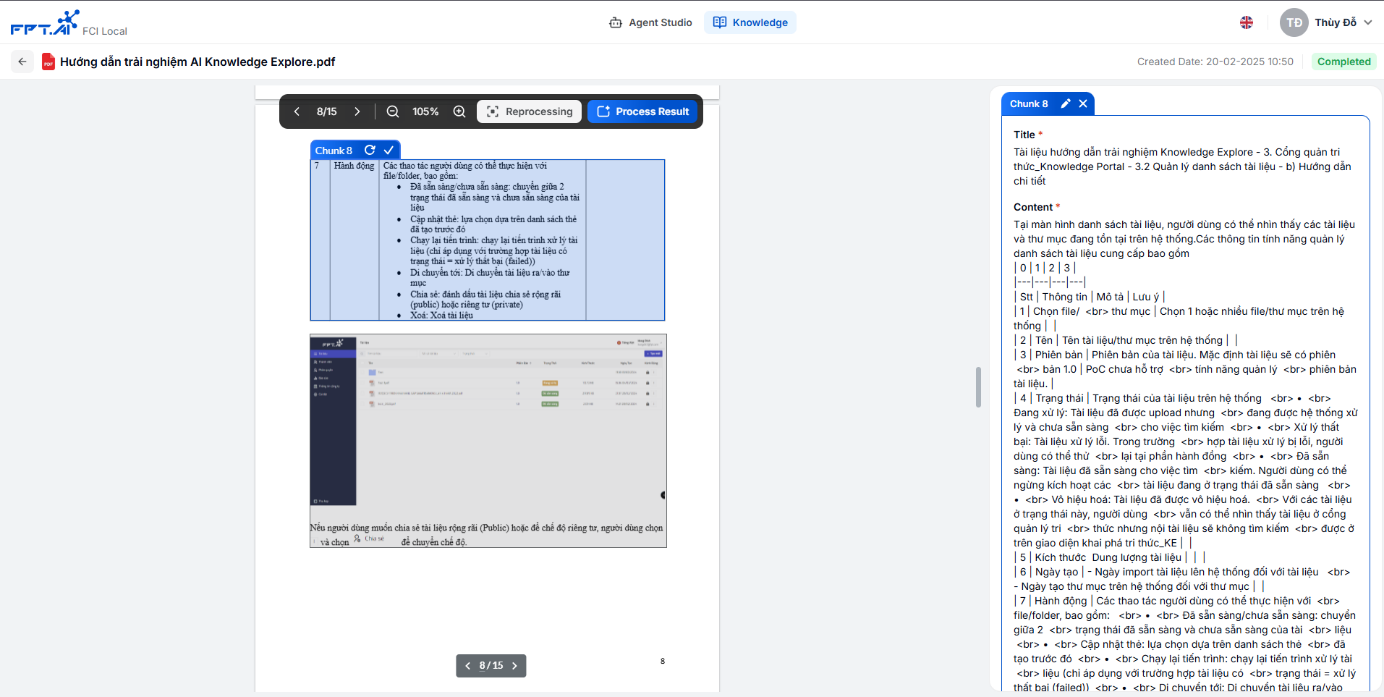
Once a user selects a knowledge from the list, the system displays the documents that have been uploaded to that knowledge.
This feature allows users to:
View the document list: Displays folders and files stored in the system.
Create, edit, and delete folders: Users can create new folders, rename them, or delete them if they are no longer needed.
Upload files: Supports uploading PDF files, which may belong to a specific folder or remain outside folders.
Bulk actions: Allows users to move or delete multiple files at once.
View document content: Users can open and read the content directly in the system interface.
Automatic file chunking: The system automatically splits documents into smaller content chunks to facilitate querying.
View chunked files: Users can review the chunks generated by the system.
Edit or delete chunks: Users can modify or remove chunks, and all changes are recorded in the system history.
Create new document in the Knowledge
Case 1: No Documents in the Knowledge
If no documents are available, the system displays: "No results found."
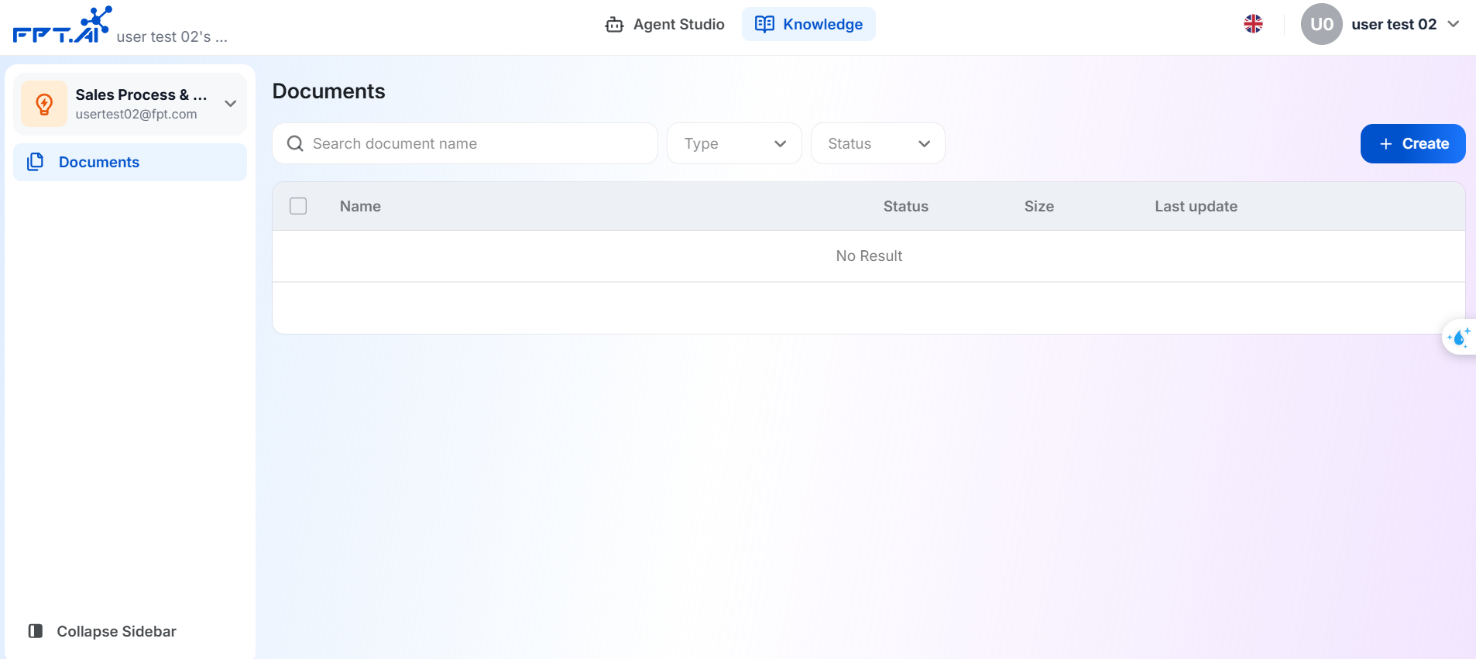
Available Actions:
Create a new folder
Upload a document
- Step 1: Click the Create button (top right of the screen)
Select "New Folder" to create a folder. Select "Upload File" to upload a PDF document.
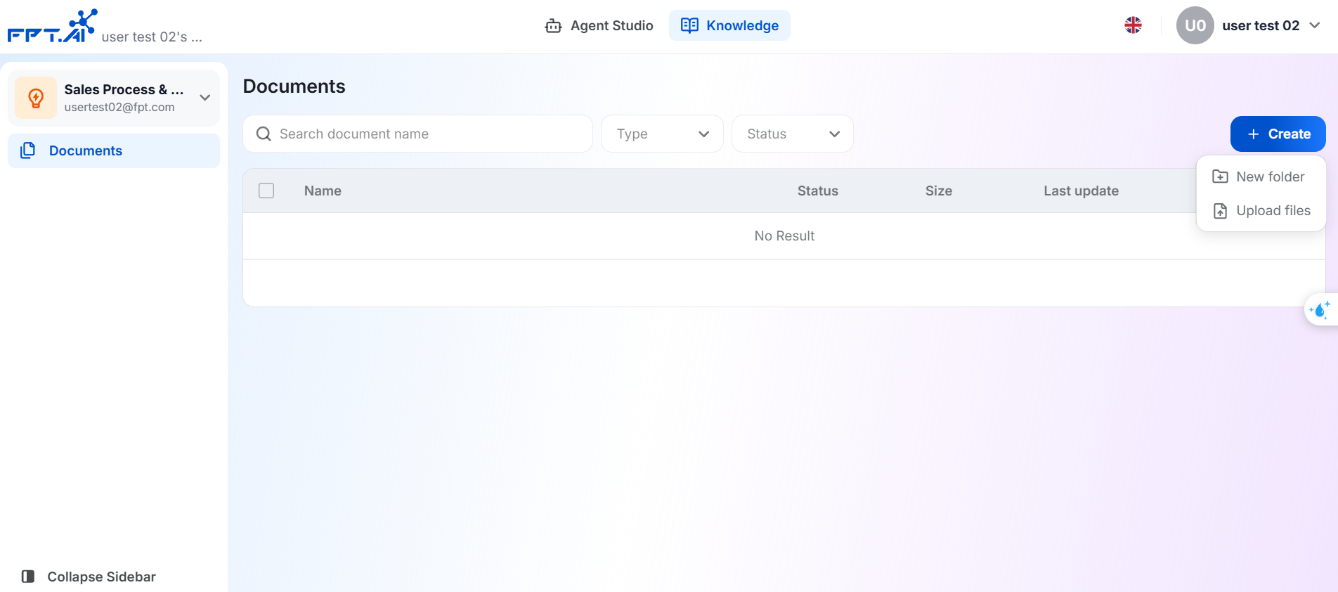
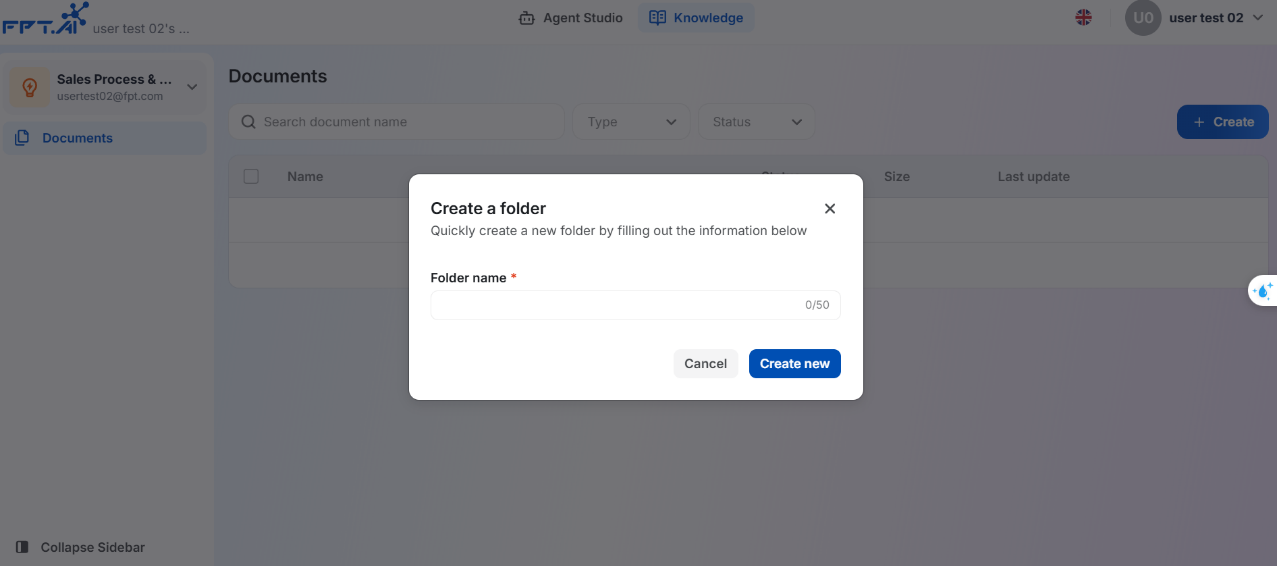
Step 2: Creating a New Folder
Click "New Folder" from the options menu.
Enter folder details in the popup window: Folder Name (mandatory, up to 50 characters).
Click Create new to complete the process.
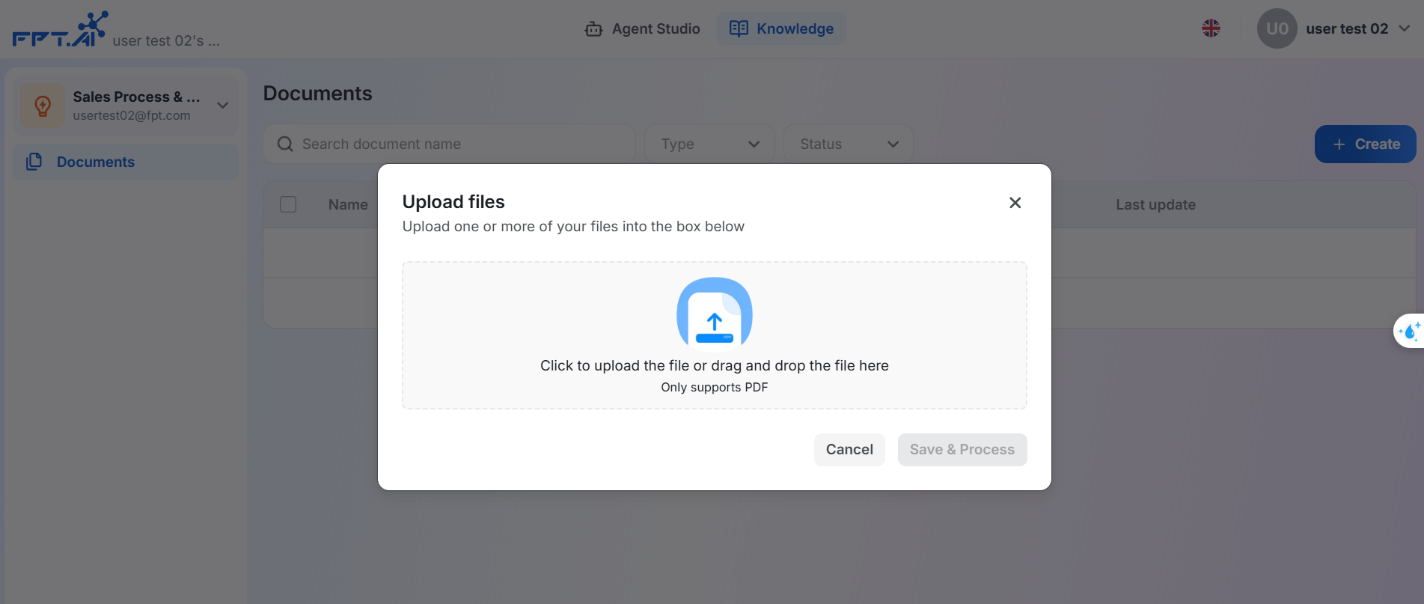
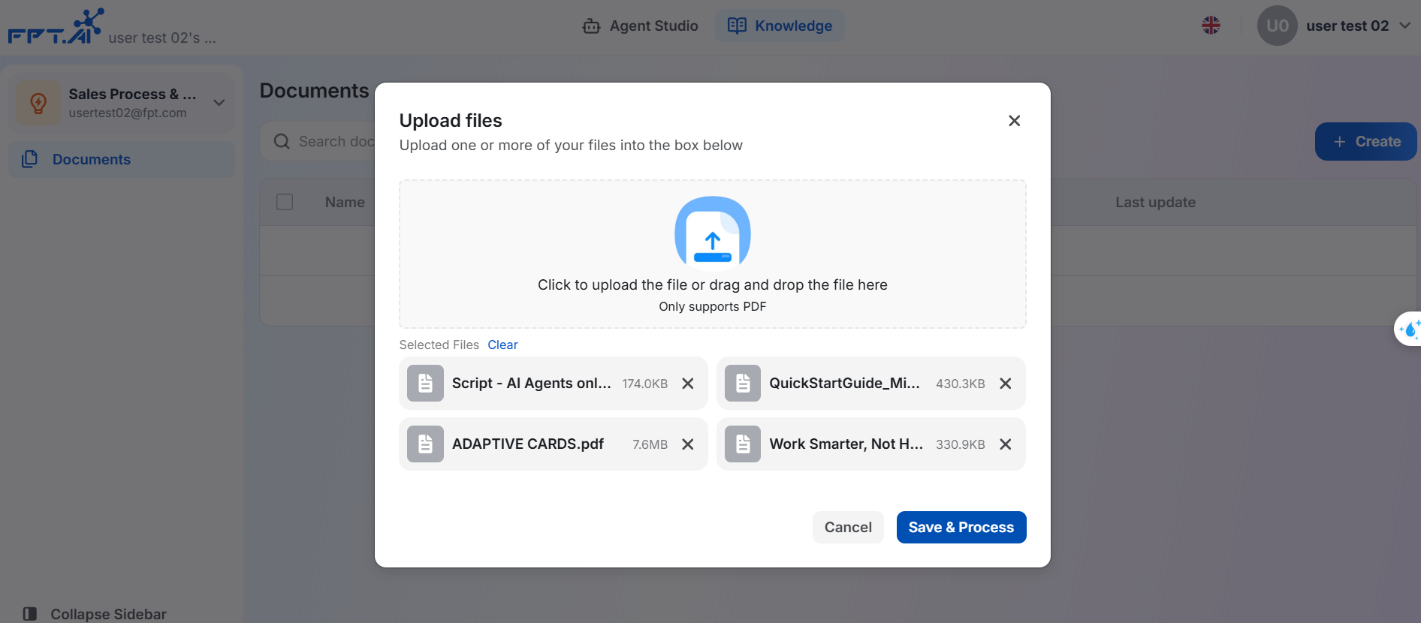
Step 3: Uploading a Document
Click "Upload File" from the options menu.
Select the file(s) to upload
A popup window appears.
Click the upload area or drag and drop PDF files into the designated section. The system only supports PDF files. Each uploaded file can have a maximum size of 10MB, and users can upload up to 6 files simultaneously.
After selecting files, the system will display the list of chosen files, allowing users to review them before uploading. Once a document is selected, the system will show the upload progress bar directly below the file name.
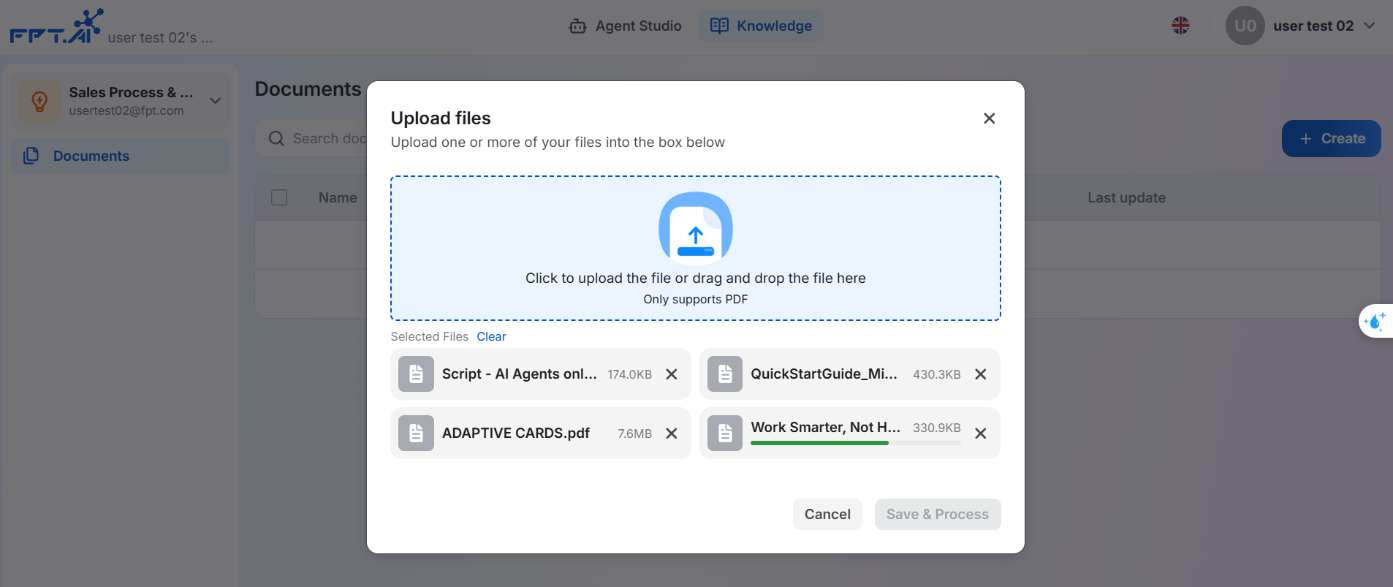
If users want to remove a specific file before uploading, they can click the ❌ icon next to the file name. To delete all selected files at once, they can click the Delete button.
To proceed with uploading, users need to click Save & Process
If they decide not to upload, clicking Cancel will discard the selected files and return them to the Document List screen without saving any changes.
Notes:
The system only supports PDF uploads.
If an error occurs, users can delete the file and re-upload it.
Multiple files can be uploaded at once.
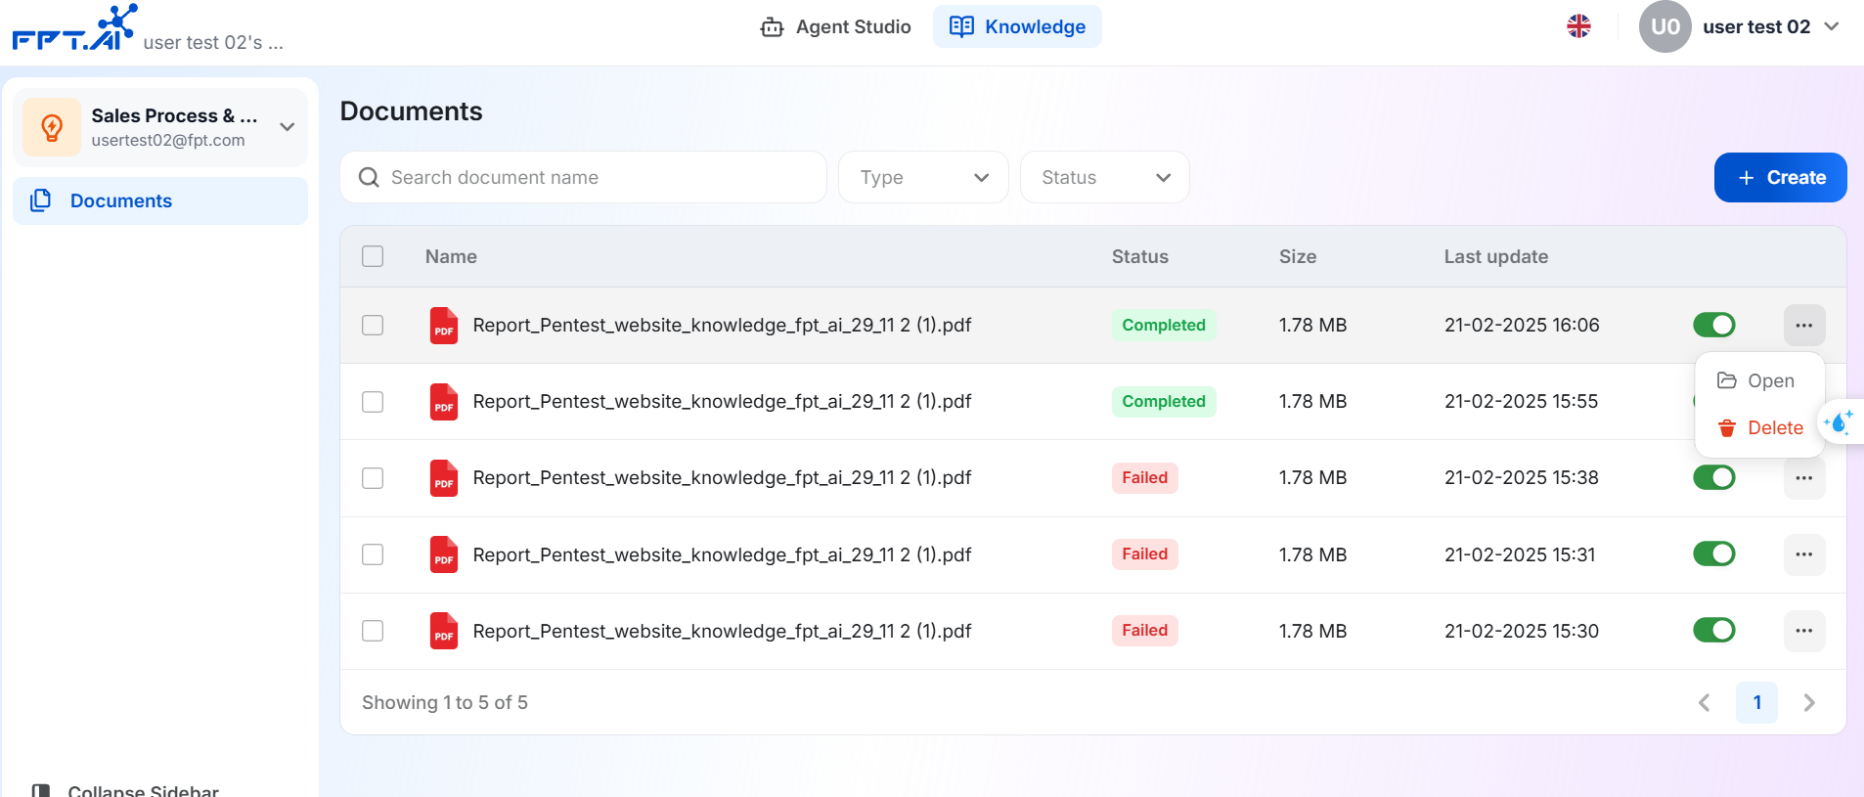
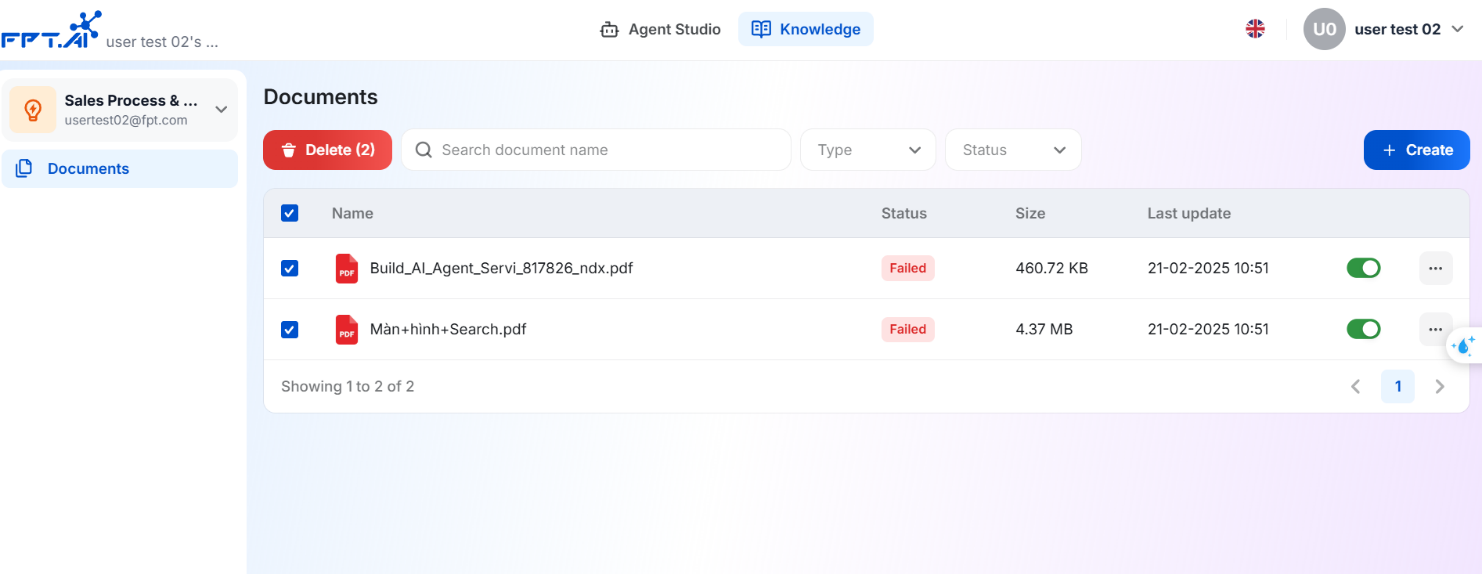
Case 2: When the Knowledge Contains Documents
Once documents are stored in the knowledge, users can perform various management actions such as searching, filtering, viewing details, editing, or deleting documents.
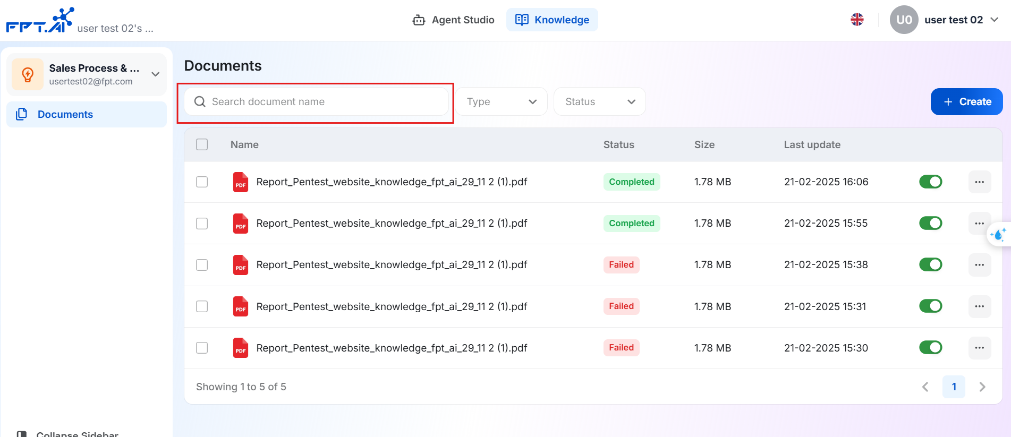
Searching for Documents
Step 1: Choose a search method
Enter keywords in the search bar to find documents.
Filter by document type: Click the filter menu and choose between Files and Folders.

Filter by document status: Click the status filter menu to select from:
Enqueued: The document is waiting for the system to process.
Processing: The document is currently being uploaded and processed.
Success: Upload was successful, and the document is ready for searching and interactions.
Fail: Upload failed due to an error.
Step 2: View Search Results The system automatically filters and displays documents that match the entered keywords and selected filters.
Notes:
Search applies only to documents within the selected knowledge.
The search is case-insensitive and supports approximate matching.
Renaming a Document
Step 1: Select the document to rename
Click the "..." (three dots) icon next to the document.
Choose Rename from the options menu.
Step 2: Edit the document name
A Rename Document popup appears.
Enter a new document name (maximum 100 characters).
Step 3: Save the changes
- Click Save to update the document name.
Notes
- The document name cannot be left blank.
- Renaming a document does not affect its content.
Deleting a Document
Step 1: Choose the deletion method
Option 1: Delete a single document
Click the "..." (three dots) icon next to the document.
Select "Delete" from the menu.
A confirmation popup appears.
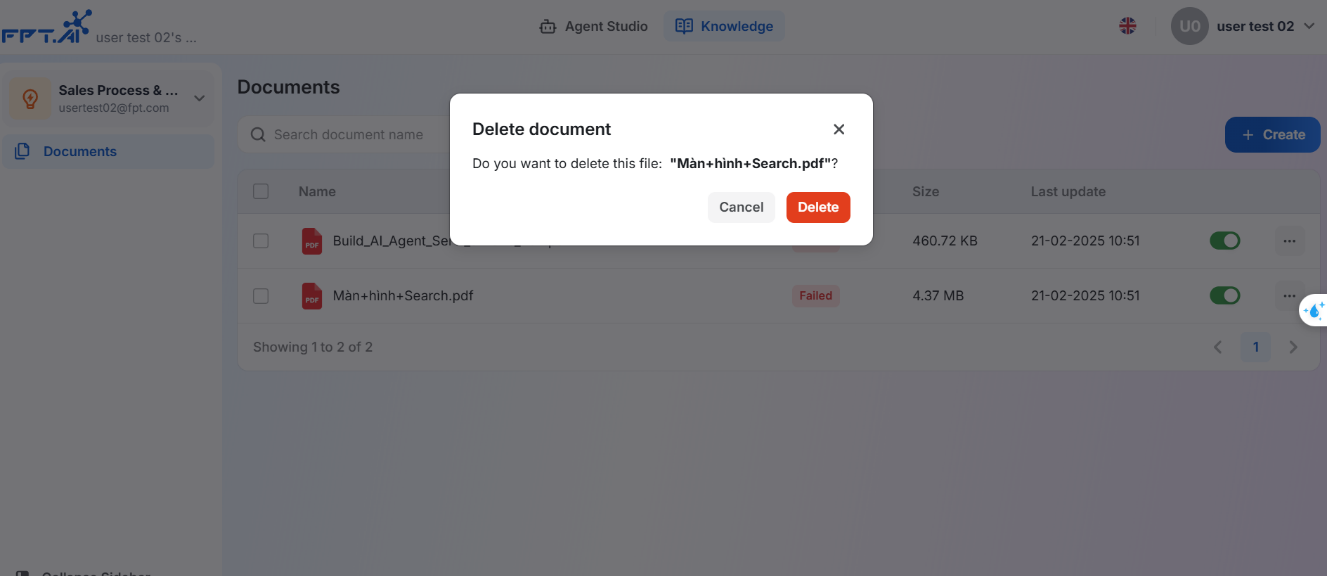
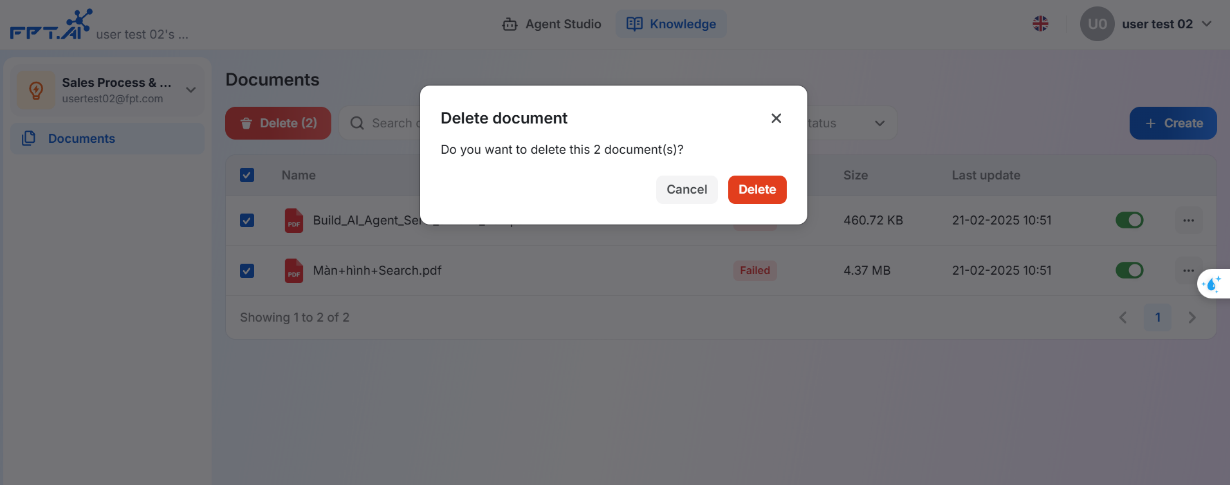
Option 2: Delete multiple documents at once
Select the checkbox for each document to delete.
Click the trash icon or select "Delete" from the menu.
A confirmation popup appears, listing the selected documents.
Step 2: Confirm deletion
Review the list of documents to be deleted.
Click Delete to confirm.
Click Cancel to stop the action.
Notes
- Deletion is irreversible - documents cannot be recovered.
- If a document failed to process, users can delete it and upload a new version.
- If a document is actively used by AI Agents, users should check before deleting to avoid affecting agent operations.
Moving a Document to Another Folder or the general document list.
Step 1: Select the document to move
Click the "..." (three dots) icon next to the document.
Step 2: Select Move
A Move Document popup appears, displaying a list of available folders. Users can move the document to a folder or remove it from a folder to place it in the general document list.
Step 3: Choose the destination folder and confirm
Select the target folder and click Confirm
Notes
Documents can only be moved within the same knowledge.
To maintain better organization, it is recommended to create folders before uploading documents.
Viewing Document Details
Once uploaded and processed, users can open and view document content directly within the system.
1. Opening a Document
Users can open a document in the following ways:
Option 1: Click the "..." (three dots) icon next to the document and select "Open".
Option 2: Double-click the document name to open it.
Notes: If the document is still "Processing" or "Failed", it cannot be opened.
2. Document Viewer Interface
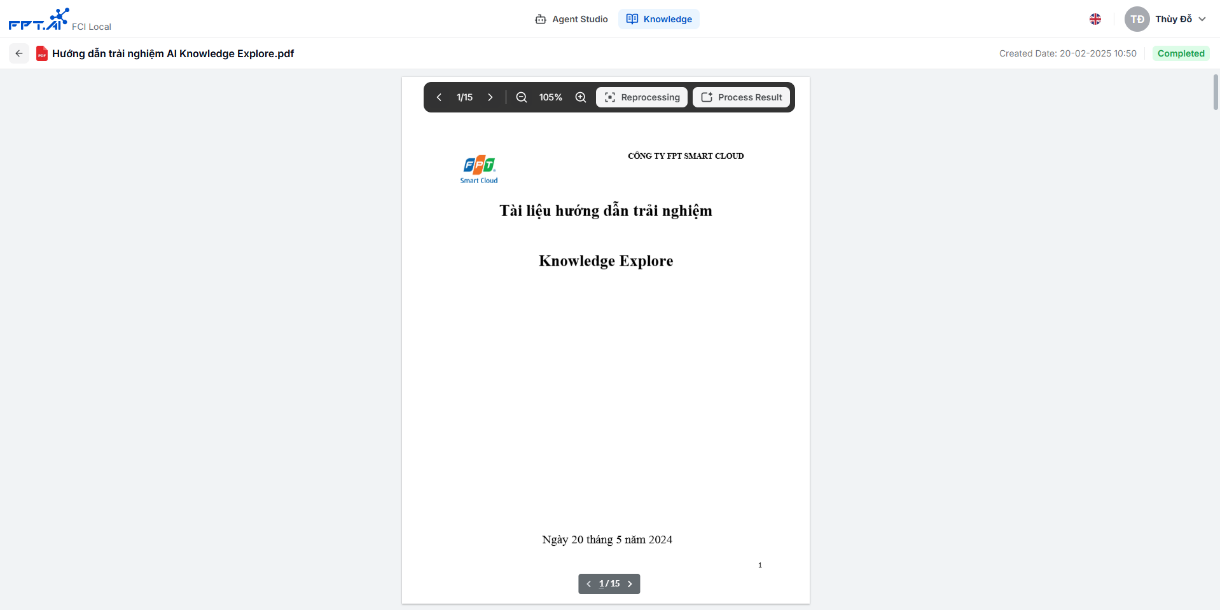 Once opened, the system displays the document viewer interface, which includes:
Navigation toolbar
Page navigation ⬅️➡️
Zoom in/out 🔍
Display scale percentage
Document content: Displays the full content of the uploaded PDF.
Processing Result Button: Clicking Process Result prompts the system to analyze the document and automatically split the content into chunks. These chunks help the AI Agent process and retrieve information efficiently.
Reprocess Button: Clicking Reprocess deletes the existing chunks and generates new ones from the document. If the document has changed (e.g., content updates) or needs better chunking accuracy, users can reprocess to ensure AI Agents access the latest content.
Notes:
Clicking Reprocess will replace all previous chunks, so users should review before proceeding.
If a document has been edited since the first processing, reprocessing ensures the chunk data accurately reflects the updates.
Chunk Management
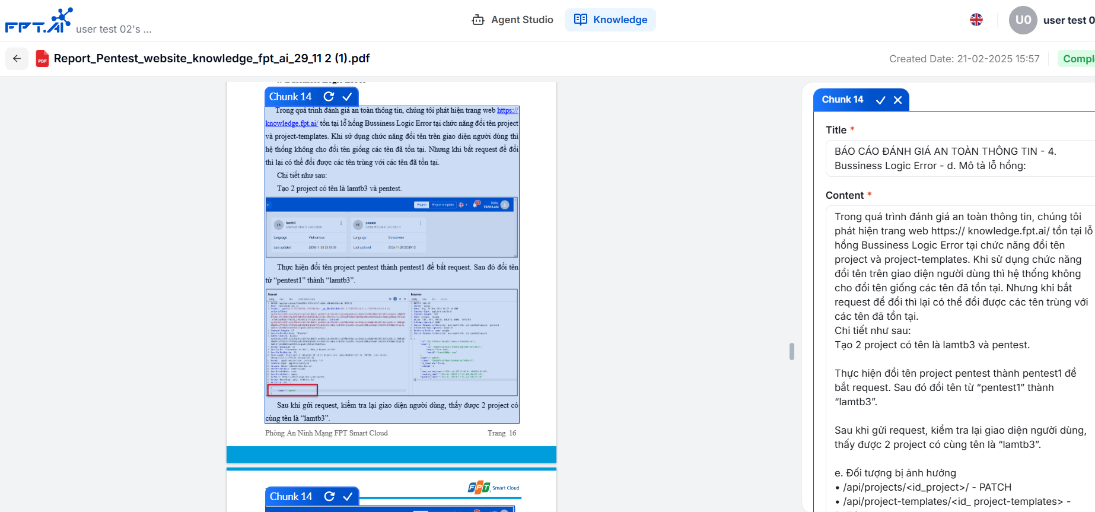
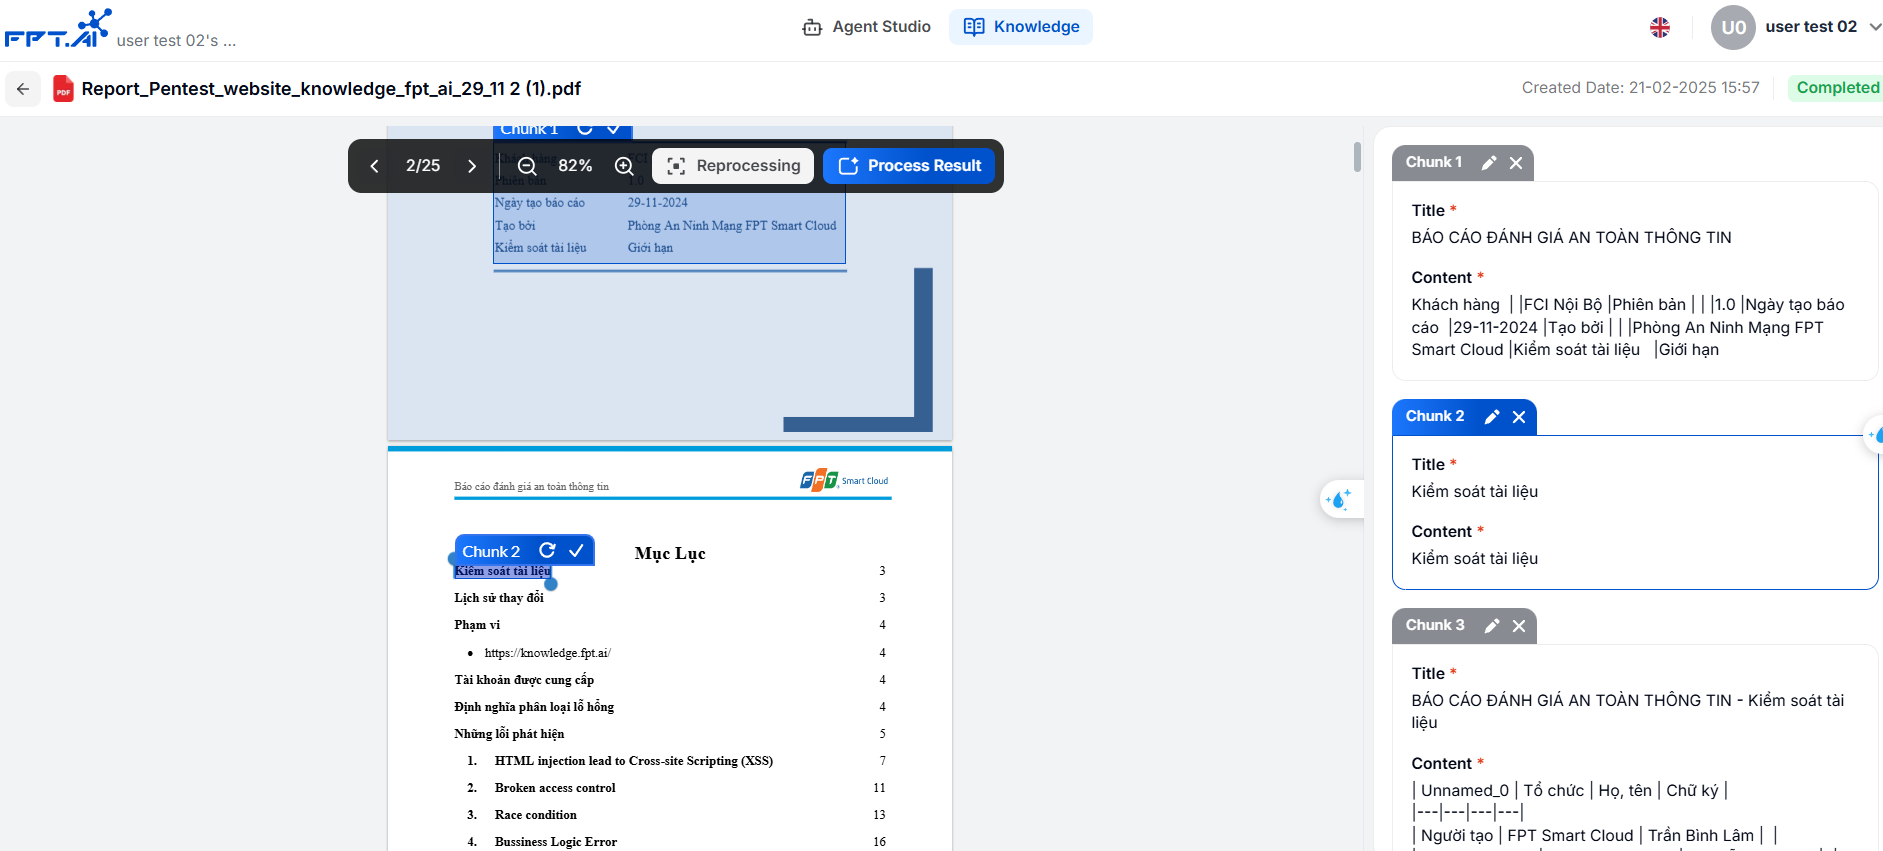
Viewing Chunks
Purpose: View the content segments (Chunks) that the system has extracted from the original document. Each Chunk represents an important piece of information, helping users to search and extract relevant data easily.
How to perform:
Click on a document from the document list to open the detailed view.
Click the Process Result button to display the Chunk list.
The system-generated Chunks will be displayed in two main sections:
Left panel: Displays the original document with highlighted content extracted by the system.
Right panel: Displays the list of Chunks, including Chunk title, extracted content, and the corresponding highlighted section in the original document.
Note: If the document has not been processed yet, you need to click Reprocessing for the system to automatically generate Chunks.
Editing Chunk
Purpose: Update the content of the Chunks extracted by the system to correct recognition errors or add missing information.
How to perform:
Click the ✏️ Edit icon on the Chunk that needs modification.
The system will switch the Chunk to edit mode, allowing the user to:
Change the Chunk title.
Update the Chunk content.
After making modifications, click ✅ Save to update the Chunk.
Note
If an incorrect modification is made, you can click Cancel to revert to the previous content.
If you need to edit multiple Chunks or regenerate all Chunks, you can use the Reprocess button to allow the system to recreate Chunks from the document.
Deleting Chunk
Purpose: Remove unnecessary Chunks or those incorrectly extracted by the system.
How to perform:
Click the 🗑 Delete icon on the Chunk you want to remove.
A confirmation popup will appear with the message: "Are you sure you want to delete this Chunk?"
Click Delete to confirm the action, or Cancel to abort
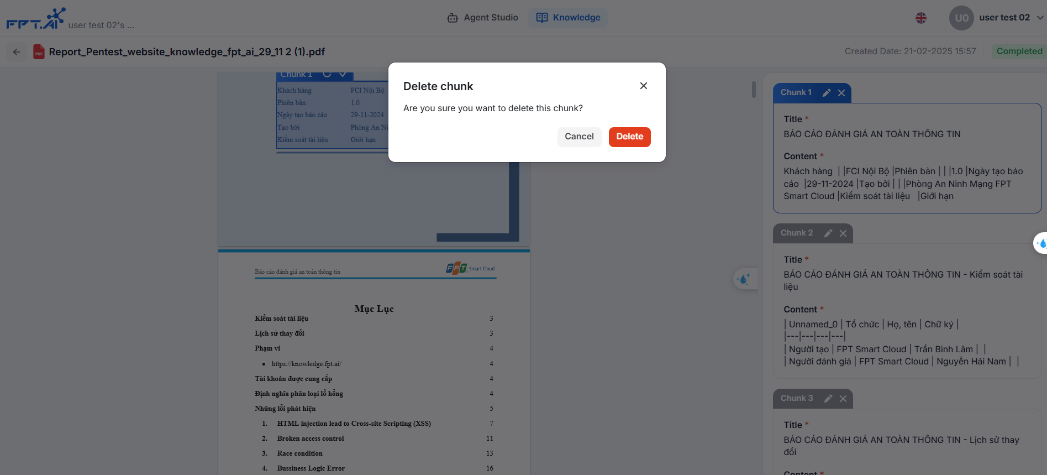
Note
Once deleted, a Chunk cannot be recovered.
If you need to restore the Chunk, you can manually highlight the original content and create a new Chunk.
Creating New Chunk
Purpose: Manually create additional Chunks to include content that was not extracted correctly or sufficiently by the system.
How to perform:
While viewing the document, highlight the text portion that you want to create as a Chunk.
Click the ➕ Add Chunk icon that appears above the selected text.
A new Chunk will be created with:
A title automatically taken from the first words of the selected text (which can be modified).
Chunk content containing the entire selected text.
Click ✅ Save to complete the Chunk creation process.

Note
You can create multiple Chunks from a single document, making it easier to organize and manage information.
If a Chunk needs to be divided into smaller sections, you can create additional Chunks by selecting different portions of an existing Chunk.
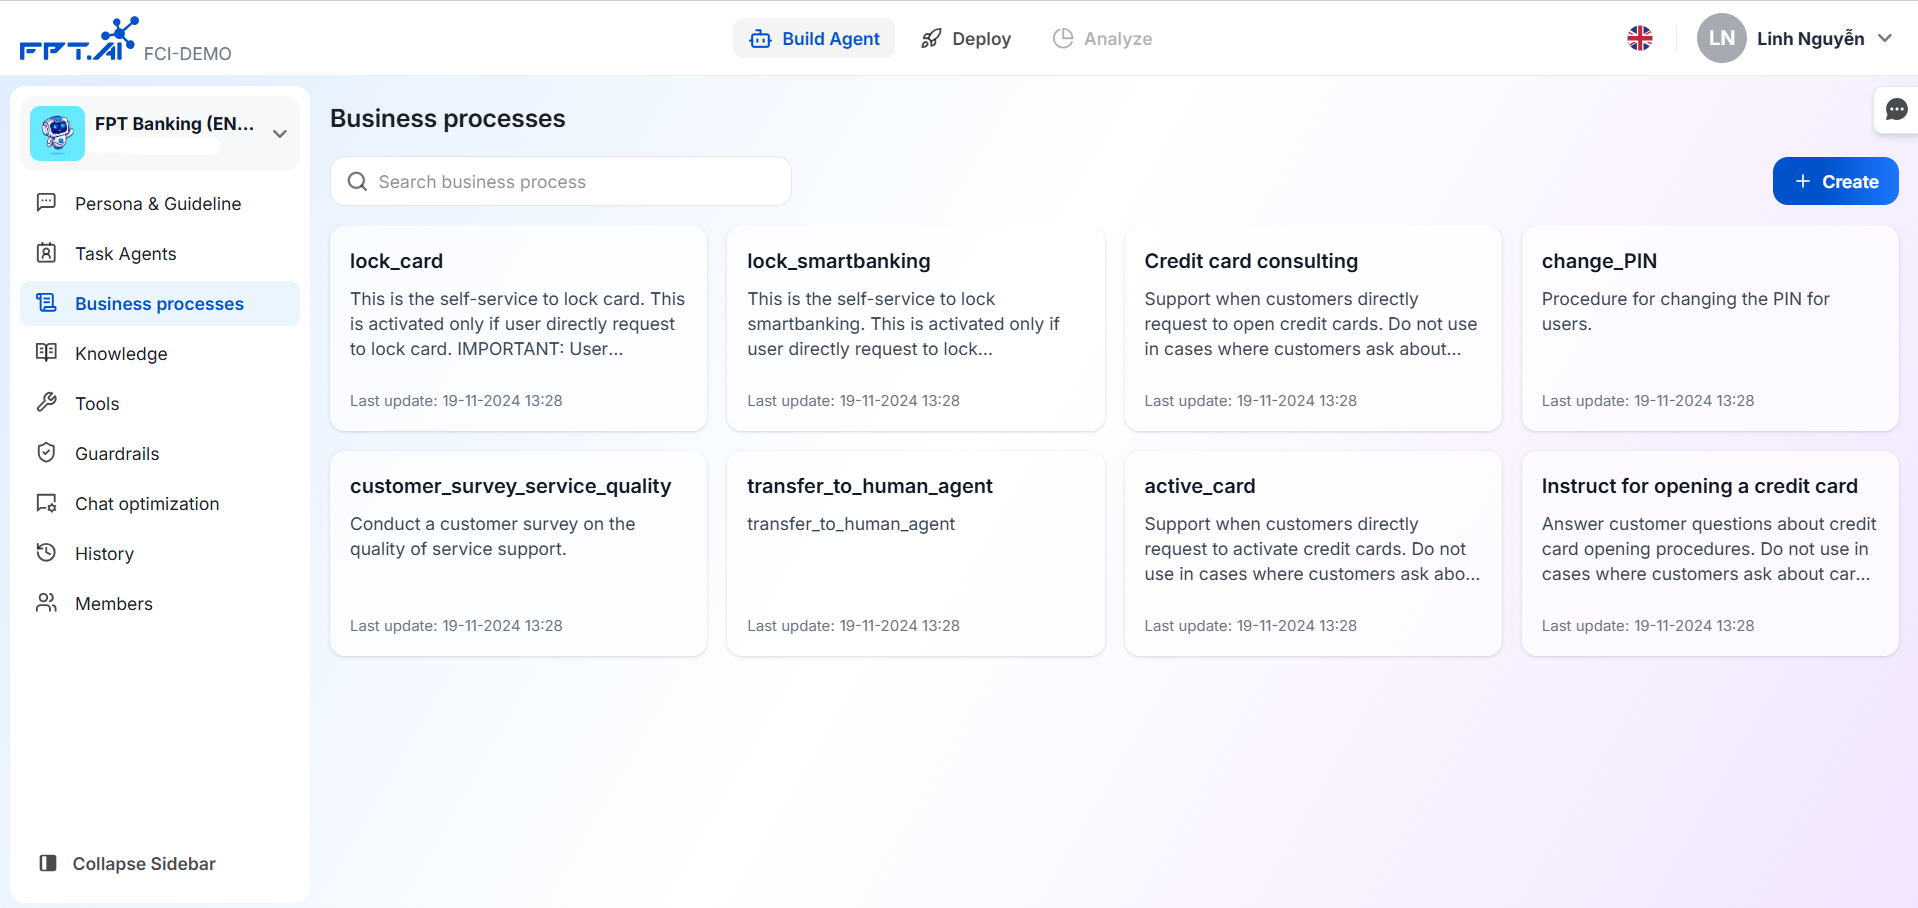
Business Processes
For AI Agent to be able to perform a specific task, you need to declare the task process here according to the instructions below.
Steps to create new Business:
Step 1: Access the Business List section in AI Agent
Step 2: Click the Create button to open a new Business
The screen displays the new creation window as shown below
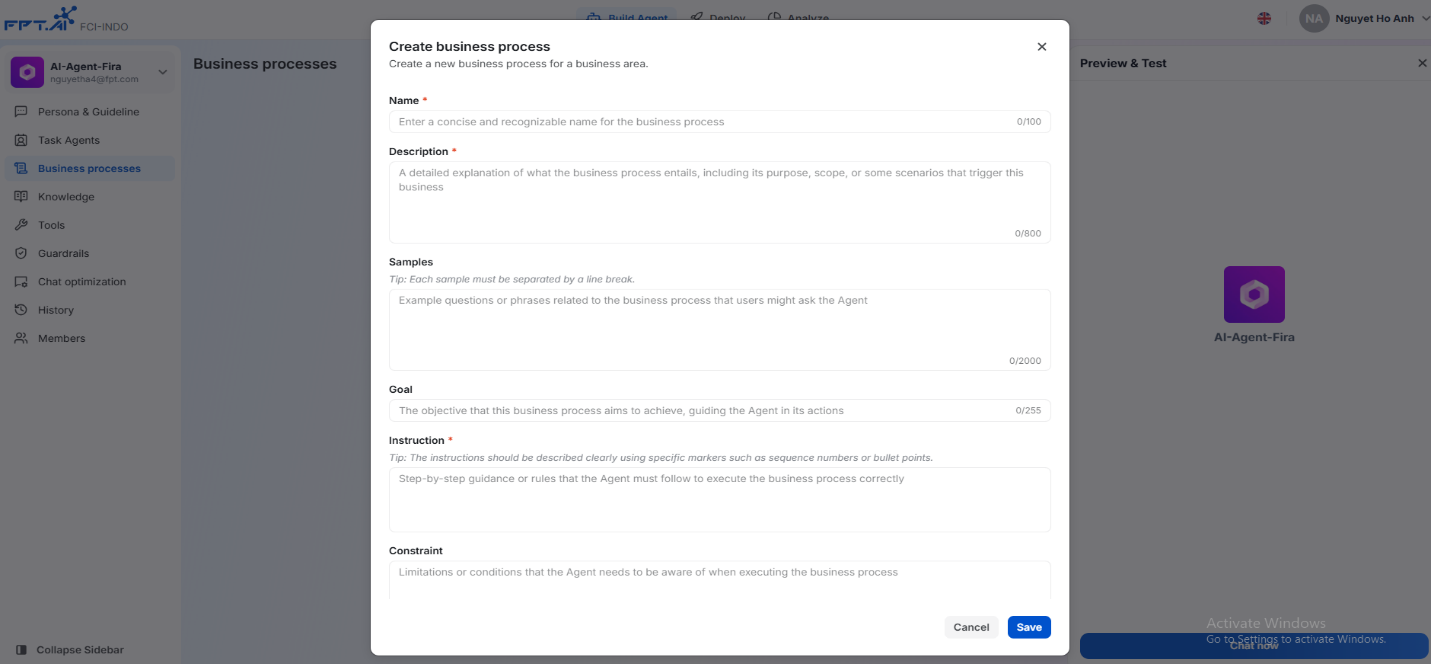
Step 3: Provide the following descriptive information for a transaction:
Business Name
Describe
Sample sentences
Target
Instruct
Limit
Step 4: Click the Create button to save the information to the Transaction. Please refer to the best practices below when building a Business:
Best practices:
Name
The Business Name should be short and clear with the syntax {verb} + {noun}. The Business Names should be clearly distinguished from each other to avoid confusion.
Note: do not leave extra spaces at the end of the Business name.
How to write a description
Write a complete, easy-to-understand description. May describe some cases that are easily misunderstood or confused with other Operations.
Sample sentences (examples for Business)
Use a variety of examples in different styles. For example, for the "Lock card" task, you can use sentences like "lock my card for me" or "my bank account was hacked, please lock my card immediately" as sample sentences.
To directly handle ambiguous cases that are difficult to explain in the description, negative samples can be used with the syntax:
###NEGATIVE_SAMPLES:
Following is {example sentence}---{exact business}
For example, the sentence "how to lock the card" wants to enter the "others" business instead of "lock the card" will have the following syntax:
###NEGATIVE_SAMPLES:
how to lock card---others
How to write instructions
- An instruction is a list of steps that the Agent will perform.
Example:
- Should:

collect information about the customer's name and phone number
verify the information provided by the customer
- Do not add some commands like:
 perform the following 2 steps in sequence
1) collect information about the customer's name and phone number
2) verify the information provided by the customer
Each request should be on one line (Start with a number or letter - do not start with a space or special character). Start with a serial number (or a name written with an underscore) and a ")"
For example: 1) Collect customer's name and CCCD number Or: collect_info) Collect customer's name and CCCD number
Each step will have 1 of 2 uses: Use the tool or Return the message to the user (# Note: Do not combine using the tool and returning the message in the same step) Example:
- Should:

- send otp to customer's phone book
- notify customer that OTP will be sent to them and ask them to enter OTP
- verify OTP entered by customer with OTP sent
- Don't:
 1) send otp to customer's phone number and inform customer that otp code will be sent to them and ask them to enter OTP code
2) verify OTP code that customer has entered from OTP code sent
1) send otp to customer's phone number and inform customer that otp code will be sent to them and ask them to enter OTP code
2) verify OTP code that customer has entered from OTP code sent
Branching condition: Describes the conditions that agents can reason about. (Each condition can be accompanied by 1 or more required actions)
Format: If <Condition> / "If" can be replaced with "When" / "If" / "When" <Space/tab/special character> Action 1 <Space/tab/special character> Action 2
Example:
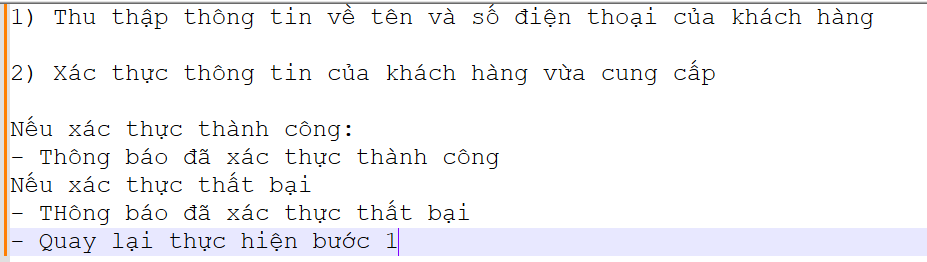
- Back - Jump to a specific step in the script
Template: Action (Go/continue/back/...) + step/step + step_name/index (respectively)
Usually instructs the AI Agent when a certain condition is met (For example, when the information authentication fails, go back to the collect_info step to do it again).
Note:This type of instruction is always a standalone step (Separate from other types of tool instructions or customer responses.
Example:
Back to step 1
Continue to step 3
Go back to collect_info step
- Stop/End Business - Goal in progress
Use keyword STOP to mark. After meeting Agent, this transaction will be considered canceled/completed.
Example:
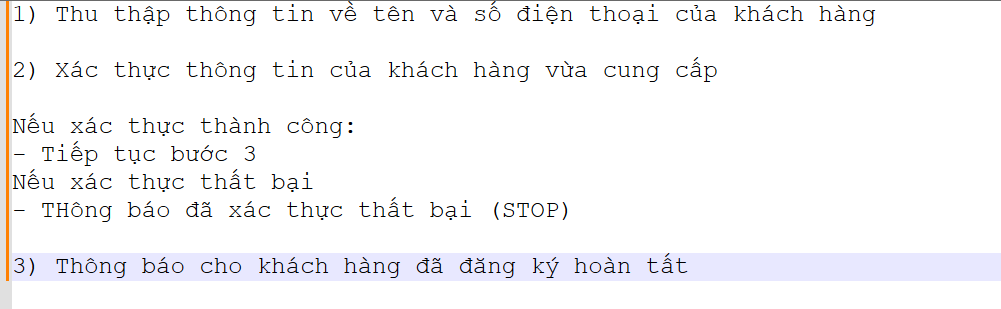

In this case, if authentication fails, the transaction will be canceled after notifying the user.
Tools
To perform an effective automated support task, a Task Agent needs to be provided with a tool to do so. For example, a Task Agent that can automatically lock a card needs to collect the necessary customer information (information collection tool), verify that the customer information exists validly in the system (customer information authentication tool), and lock the card directly on the system (API tool to lock the card).
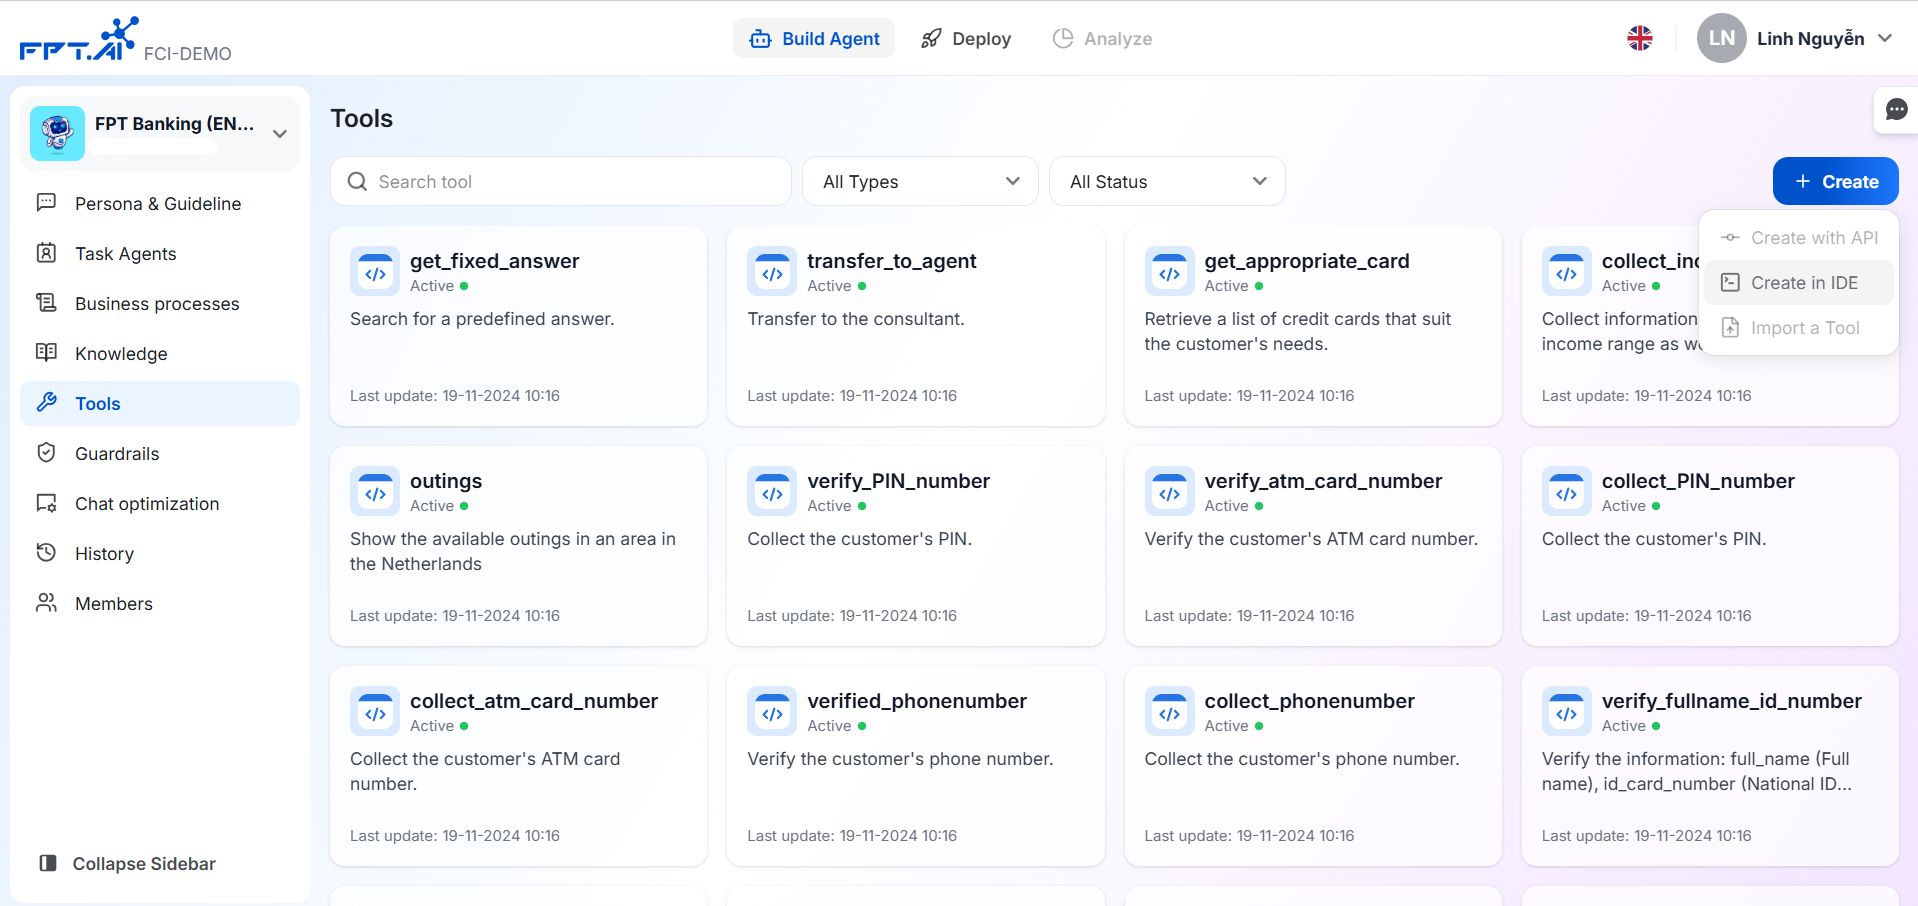
You can create a new tool in 3 ways:
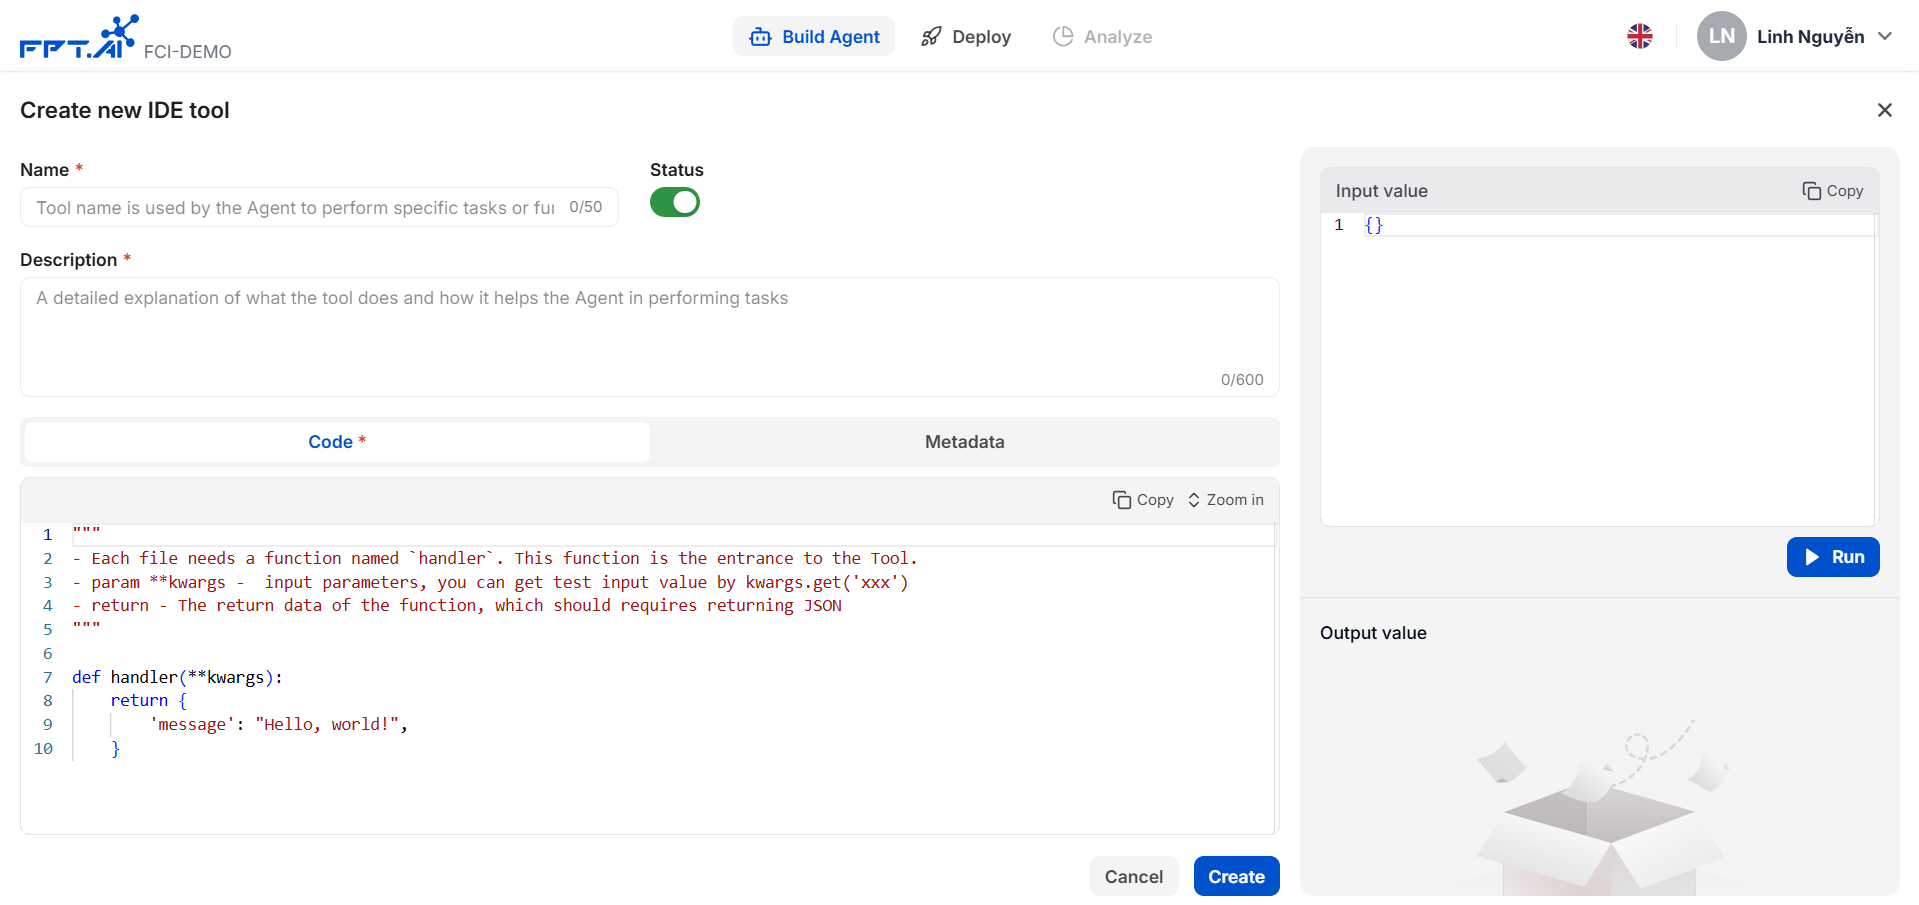
Create with API
Create with IDE: you need to provide the following information fields:
Name: The name of the tool. The name should be short and descriptive to help LLM select the appropriate tool.
Description: Explains in detail what the tool does and how it helps the AI Agent perform tasks.
Code: Programming code for tool processing
Metadata: Contains the input and output variables mentioned in the tool's Code. When adding a variable, you need to pay attention to the following information:
Keep variable names short
Describe the variable clearly (e.g. string, integer, real, ...) if ambiguous add an example
Variable type: Includes string, number, boolean
Required Field: Required to run this tool (Agent will automatically extract from the conversation with the user and information from previous tools) -> If still not found, it will notify the user to be provided.
Save to memory field: Select to save the variable -> If you find this information valuable for use in dialogue (or necessary to perform the tool) in the next turns
Check the code:
Input Value: Input variable entry area, required format is JSON
Run and test the code by pressing Run, the result is returned in the Output Value area.
Import tool: You can import an existing tool into AI Agent
Guardrails
The Guardrails feature is used to control the AI Agent's response content, limiting inappropriate content (because with Generative AI technology, AI Agent can automatically generate sensitive responses, which may not be suitable for the culture, ethics, or some other criteria of the business). To create a new topic to restrict, simply click Create and provide the following information:
Subject: Enter a short subject that should be limited
Description: Describes the restricted content of the topic.
Sample sentences: Some sample sentences help AI Agent visualize what kind of questions should be limited.
Response: The answer the AI Agent will give in this case.
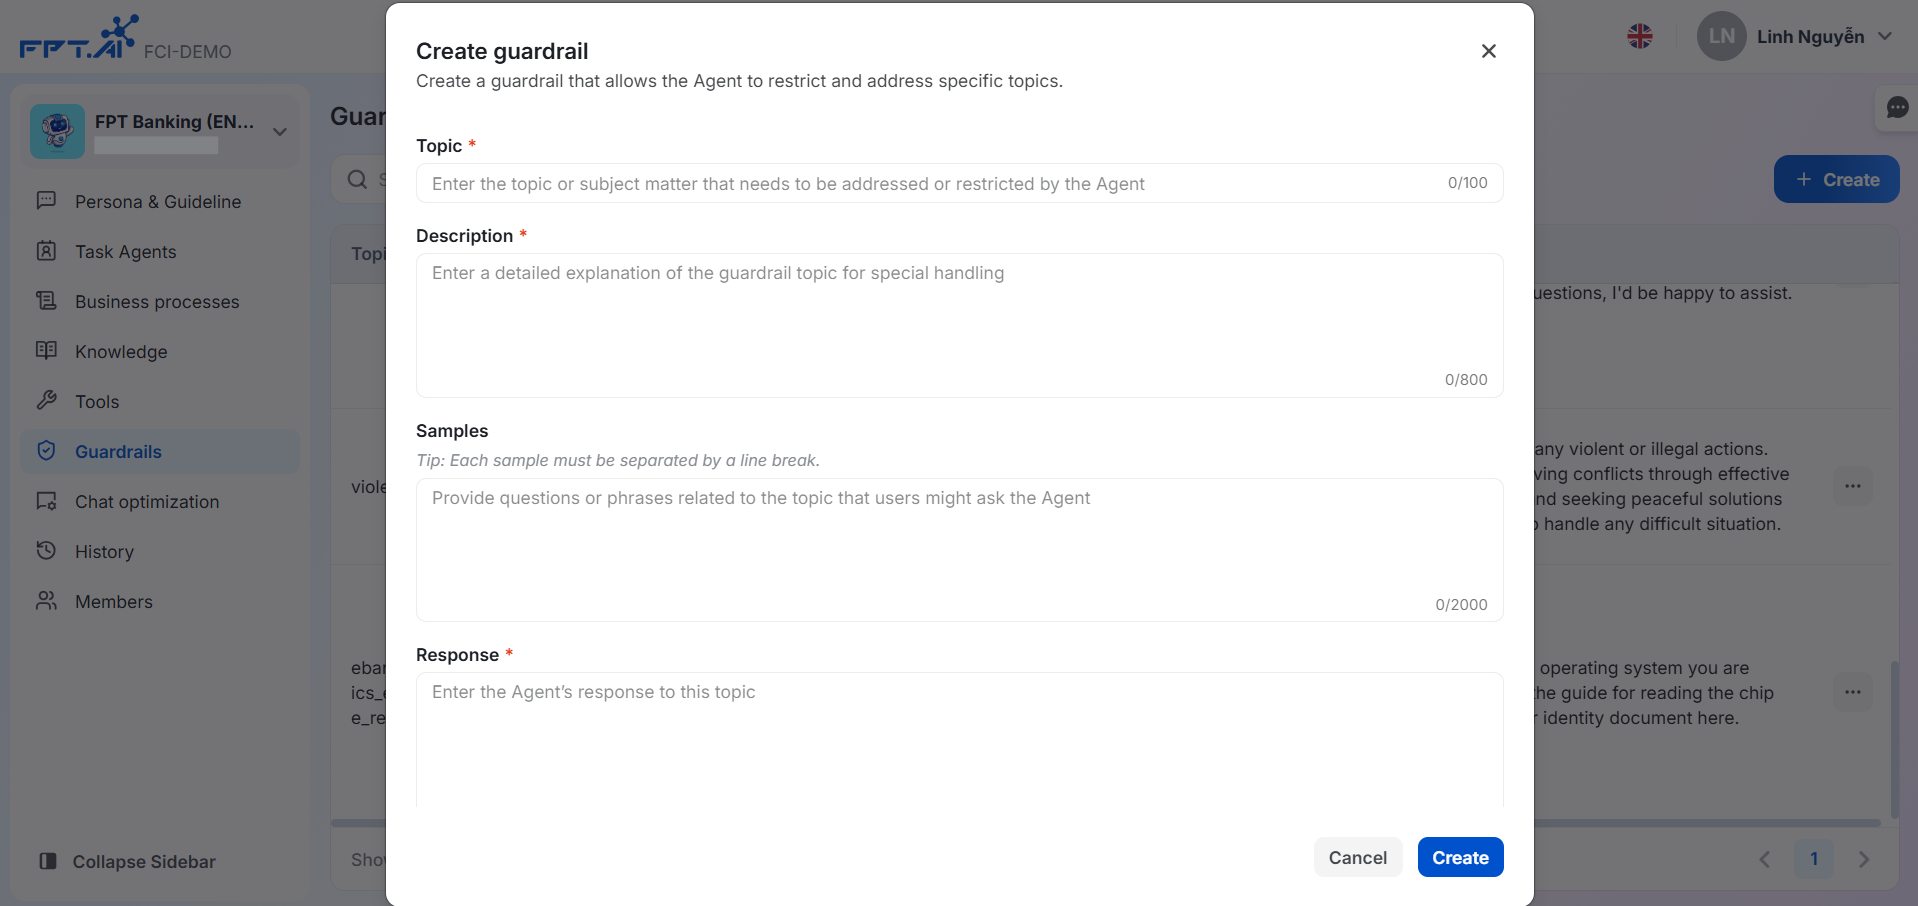
Note that you don't need to create too many sample sentences but each sample sentence needs to be separated by a new line.

Chat optimization
Chat optimization includes the "Conversation Starter" feature. This feature enables flexible greeting configuration for each Agent, thereby enhancing the customer experience.
To set up the Agent's greeting, go to Optimize chat -> Opening
conversation configuration screen. On this screen, you need to note
the following information:
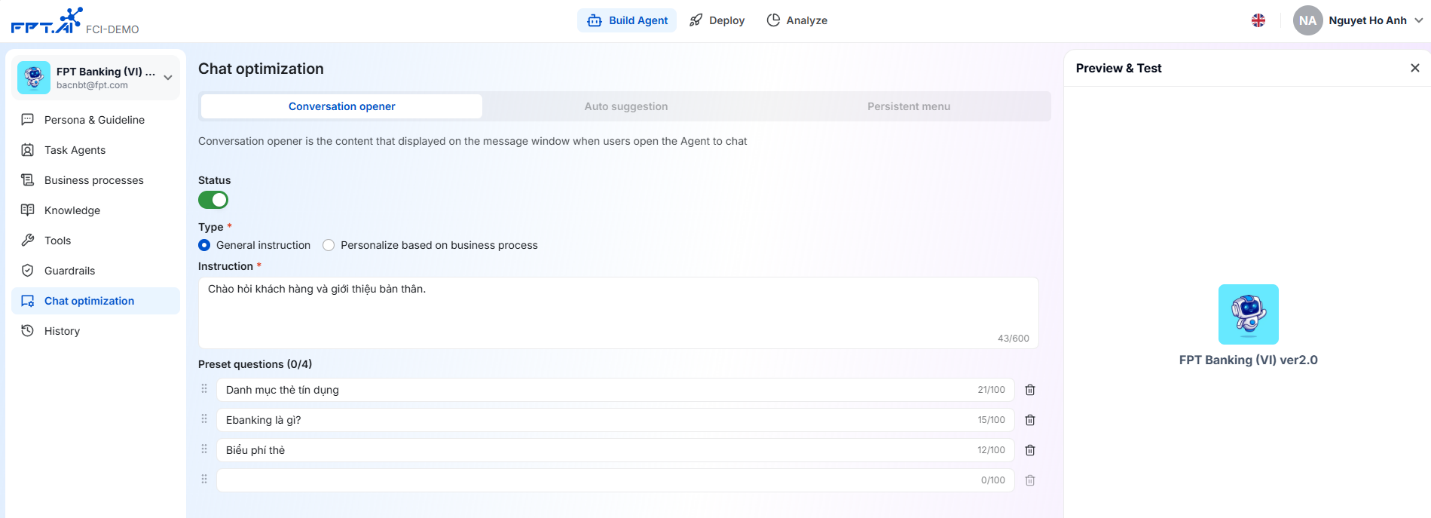
- Status: On/Off button for the Conversation Starter feature
- Type: how you want to structure your Agents greeting:
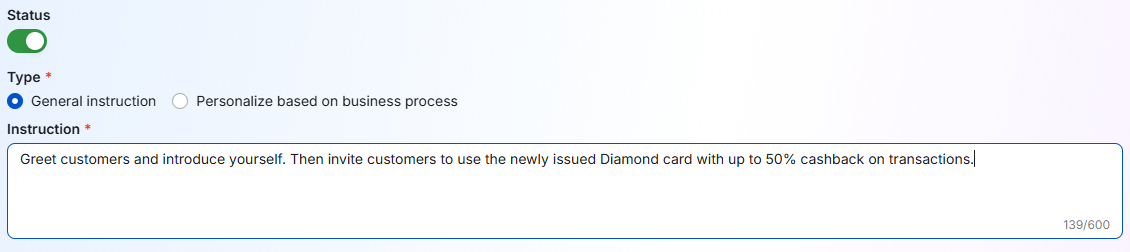
- Method 1: Set up a general instruction in natural language as shown in the example below. The general instruction is a prompt for Agent to generate a greeting according to the wishes of the AI Agent builder.
- Method 2: Personalize settings according to the created tasks in the Task List section.

- Preset questions: are buttons with fixed content installed in the Agents greeting
After completing the above content, click Save to complete. You can preview the newly configured greeting of Agents right on the Preview and Test section.
Preview and test
When building AI Agent on FPT.AI AI Agents platform, you can chat with AI Agent and immediately receive changes of AI Agent, and can check AI Agent logs to check quality with Audit function.
.png)
Audit
In the "Preview and Test" and "History" interfaces for each AI Agent response, you can see the results of each step the AI Agent took to provide the response.
.png)
The Audit interface will have the following information:
Status: whether the execution result is successful or failed
Latency: the time it takes for the AI Agent to process and give an answer
Tokens: total number of tokens used to generate the answer
Message ID: the identifier of the AI Agent message
Conversation ID: the identifier of the conversation
Start time: the time the system receives the customer's message
End time: the time it takes for the system to finish generating the AI Agent's response
Flow: the flow of Agent components, the components can be different depending on each customer chat. The list is sorted by the completion time of that component.
When selecting each component of the stream we can see the following information:
Start time: the time the component execution started.
Finish time: time to complete
Status: whether the component execution result was successful or failed
Latency: the time it takes to complete this component.
Token: number of tokens using LLM to execute.
Input: The input information of the component
Output: The output information of that component.
History
You can track and manage the history of users chatting with AI Agent in the History menu.
Conversation List Interface
When accessing AI Agent and selecting "History", users will see a list of conversations that have taken place. Each line in the table represents a conversation and includes the following information:
End Time: The time the conversation ended.
Conversation ID: Unique identifier of the conversation
Channel: which chat channel the conversation is coming from.
Username: The name of the person chatting with the AI Agent
Number of messages: Number of messages in a conversation.
.png)
Users can search and filter conversations using filters by time, chat channel, search by identifier or message content.
- View conversation details
To view the details of a conversation, users simply click on the corresponding row in the list. The conversation details interface will have the following information:
Customer message, time the system received the message.
AI Agent messages: Message content, time the system received it, user response to AI Agent messages if any
DEPLOYMENT AND INTEGRATION
Website Integration
To integrate AI Agent on your website's livechat window, follow these steps:
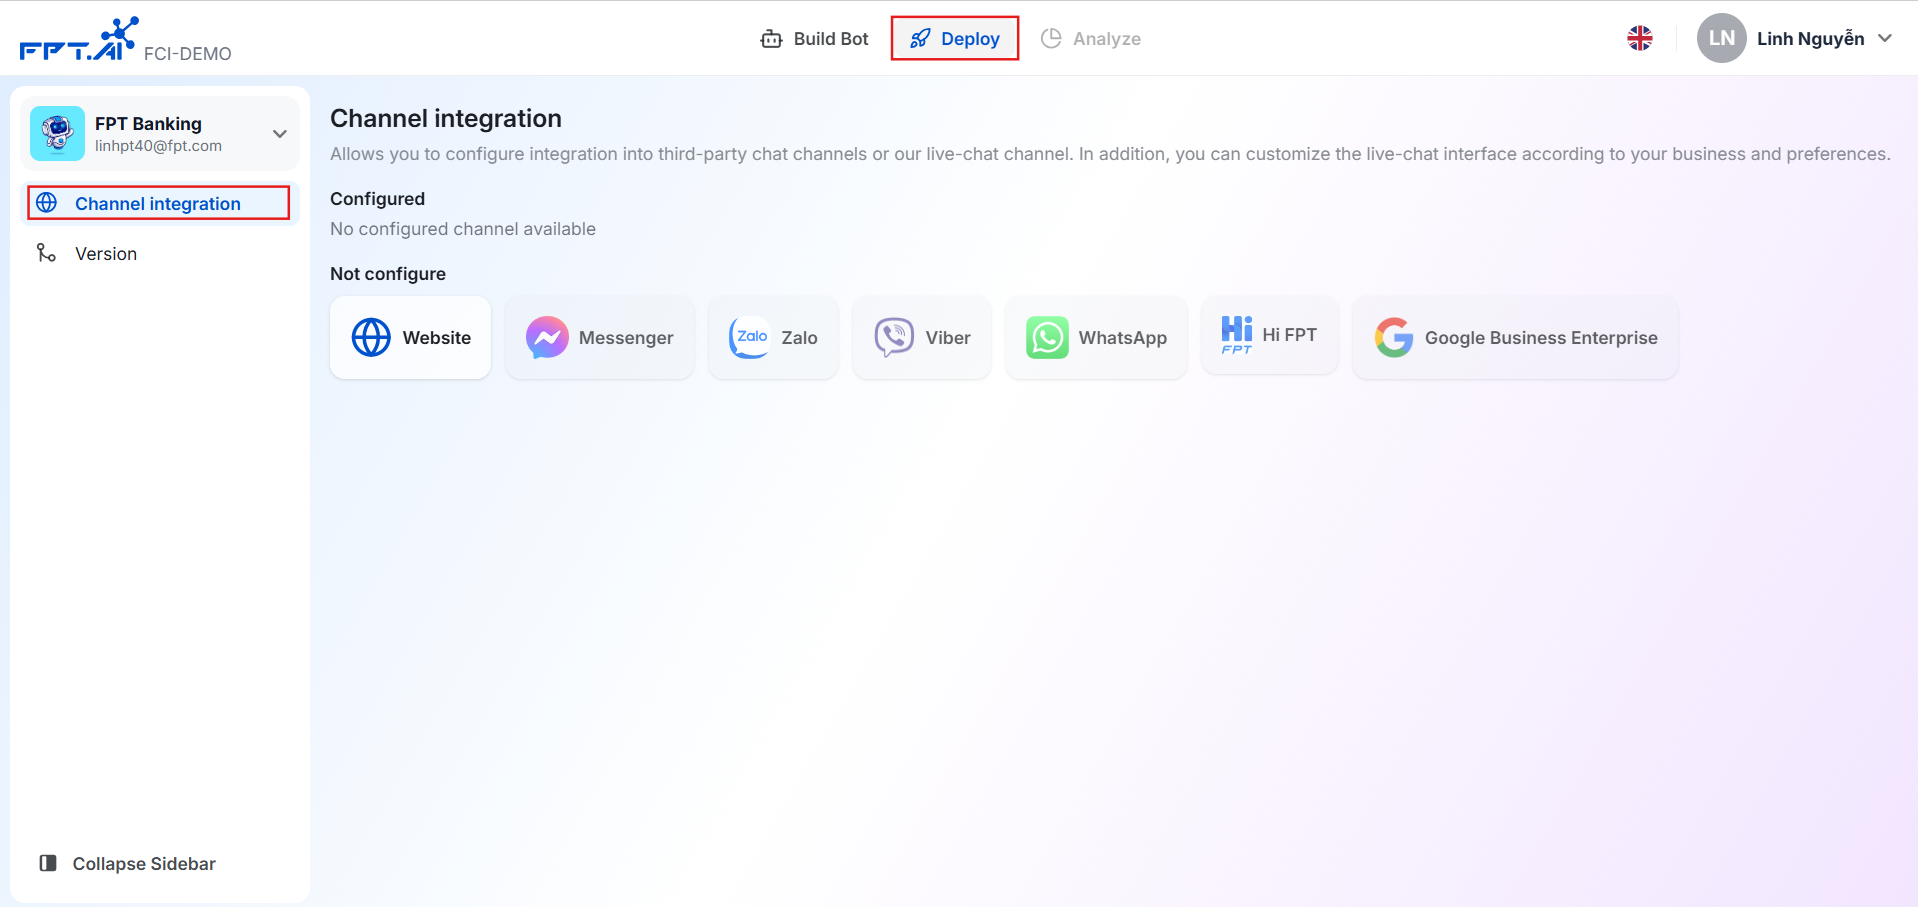
Step 1: Go to AI Agent and select "Deploy" on the toolbar above.
.png)
Step 2: Configure whitelist domains (allows users to define which websites are allowed to appear on Agents chat, and prevents any requests to websites not on that list). For example, your website has a link to https:/abc.com Enter this path into whitelist domains and click Save.
.png)
Step 3: Copy the code and put it into the website source code, then paste it into the html page in the body tag.
.png)
Zalo integration
First, users need to have an official Zalo account for their business. To create an account, follow these steps:
Step 1: Go to page https:/oa.zalo.me/ to create Official Account
.png)
Step 2: Create an application for developers to get API to connect with Agent through the following steps:
- Go to page https:/developers.zalo.me/ to create an App
.png)
Go to page https:/agents.fpt.ai/bots Select the Bot to connect Select the "Deploy" tab Select the "Chat channel integration" menu Select the "Zalo" channel
On the application interface, copy the App ID and Secret Key into Zalo's Setting on the bot.
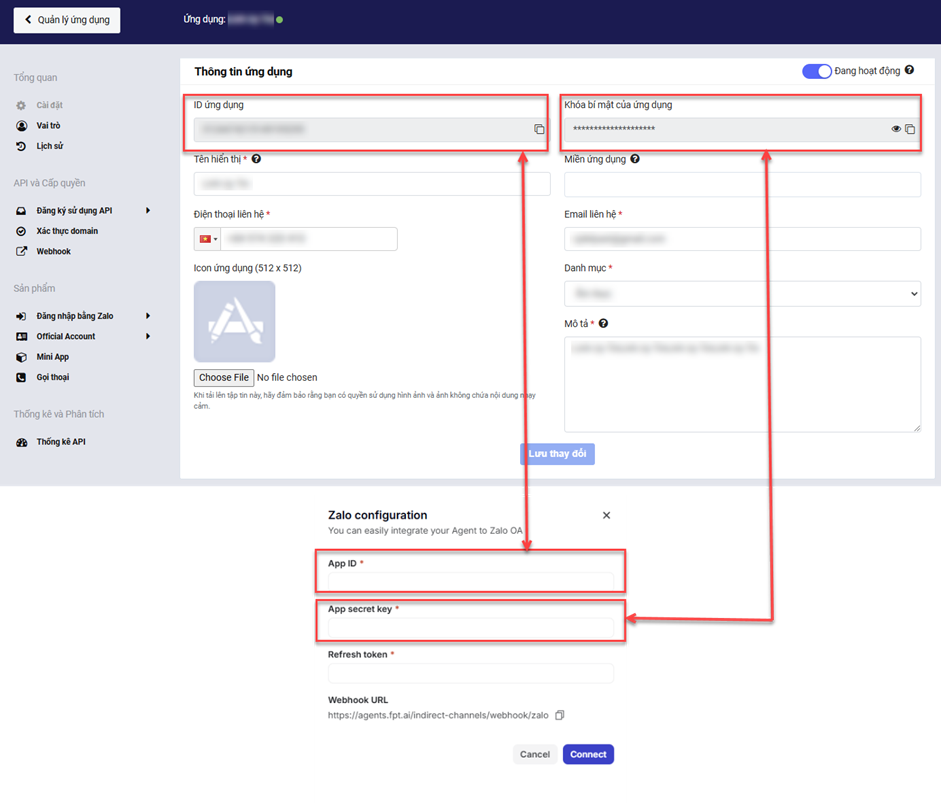
Step 3: Domain authentication
- Copy Webhook URL in Zalo configuration section on Bot
Paste into the "URL Prefix" box in the "Domain Authentication" menu on web developers.zalo.me
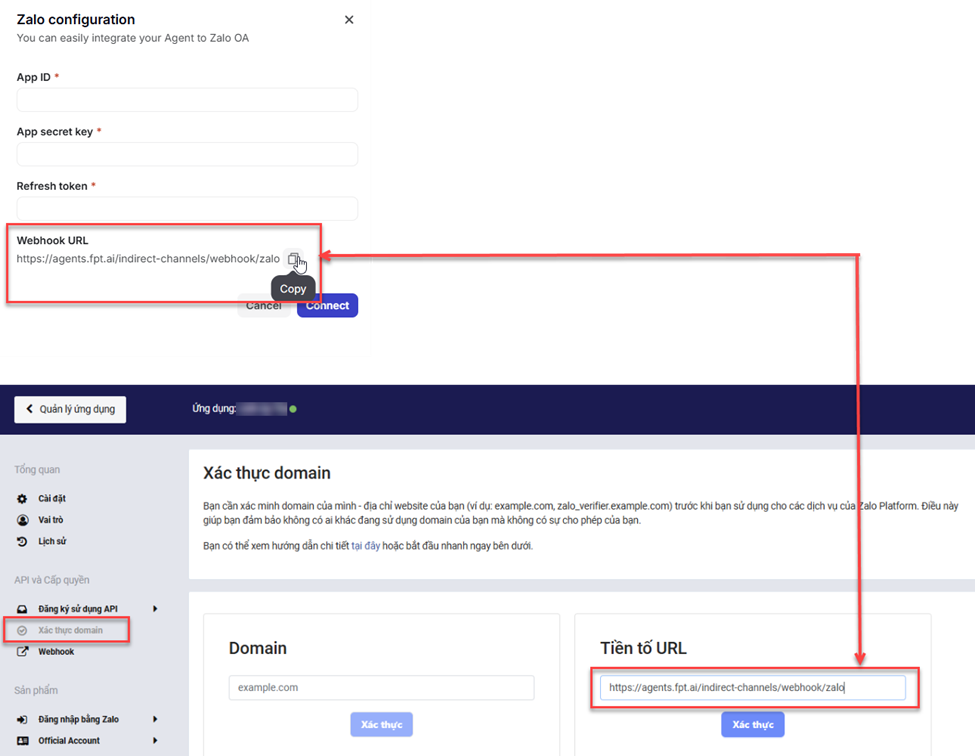
Step 4: Register Bot Webhook for Application
Copy the newly authenticated URL https:/agents.fpt.ai/indirect-channels/webhook/zalo then paste it into Wehook URL
Click Check -> Update
.png)
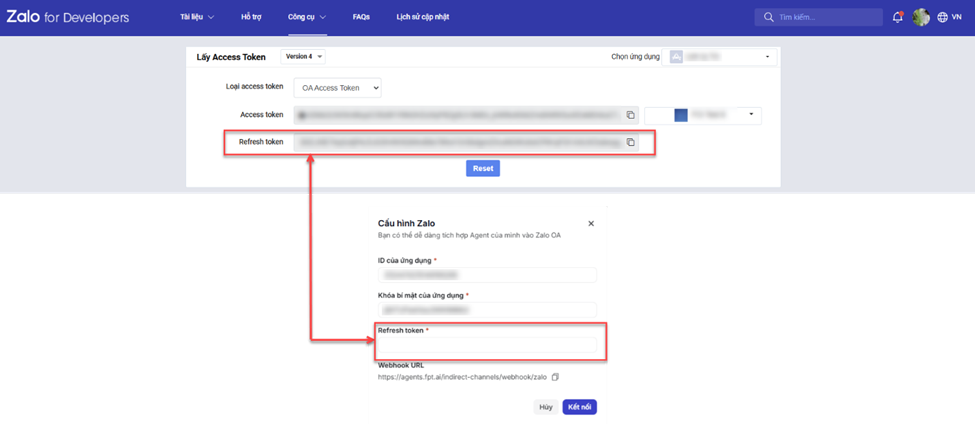
Step 5: Get Application Refresh Token
Go to API Explorer under "Tools" on Zalo for Developers page
.png) Select "Version 4"
Select "Version 4"
Select the application you just created
Access token type: "OA Access Token"
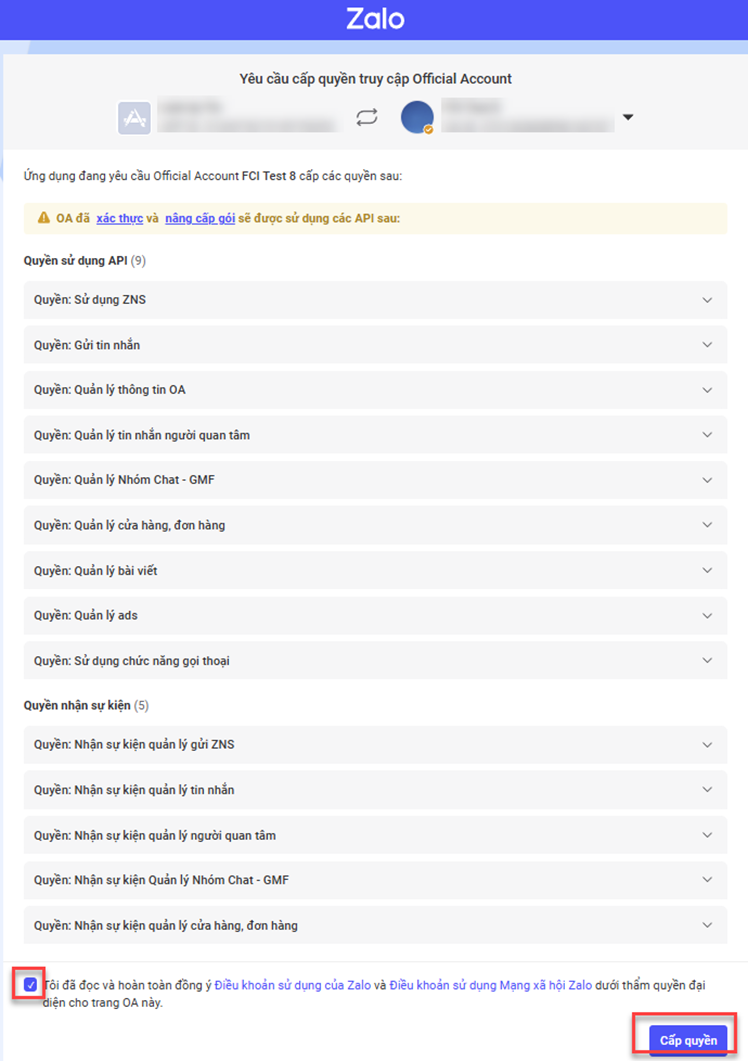
Get access token: Select the newly created Official Account
.png) Confirm rights
Confirm rights
.png)
Step 6: Copy refresh token to Zalo settings on Bot
 Click "Connect"
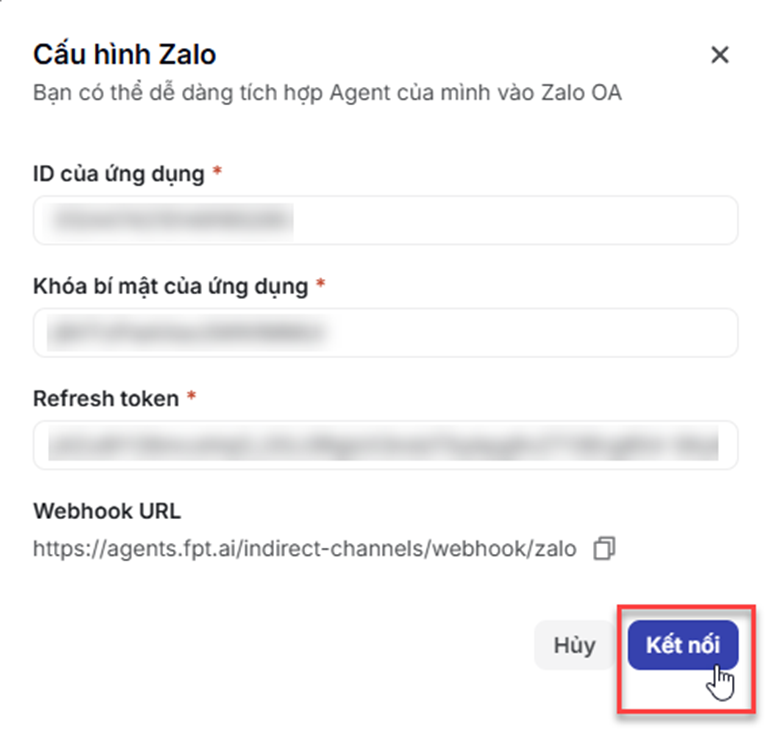
The interface displays the message "Connection successful".
ACCESS MANAGEMENT
User Permissions in Workspace
About Workspace
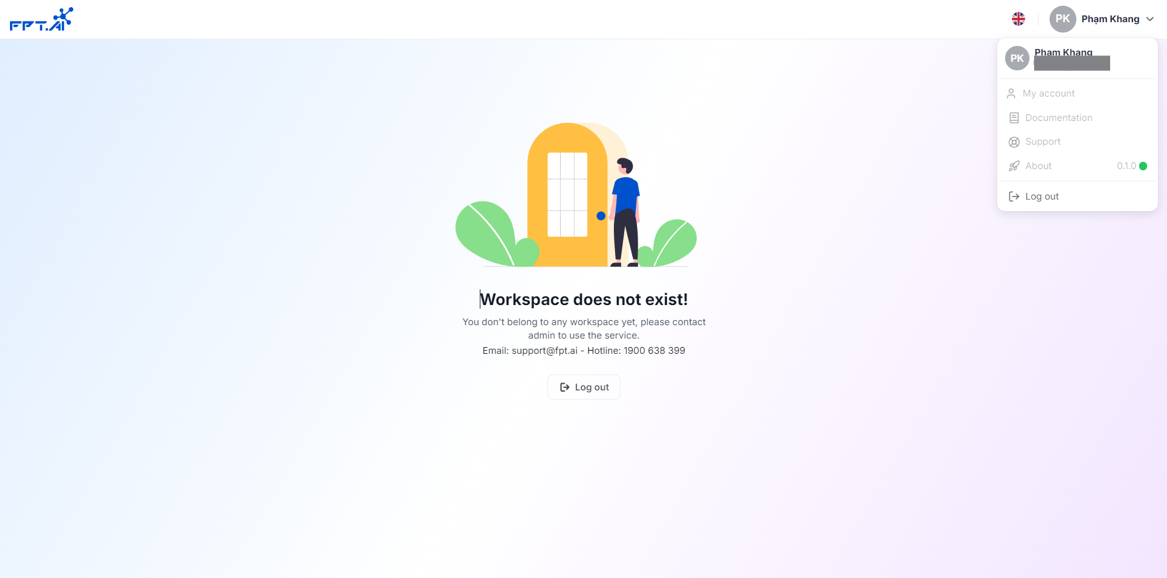
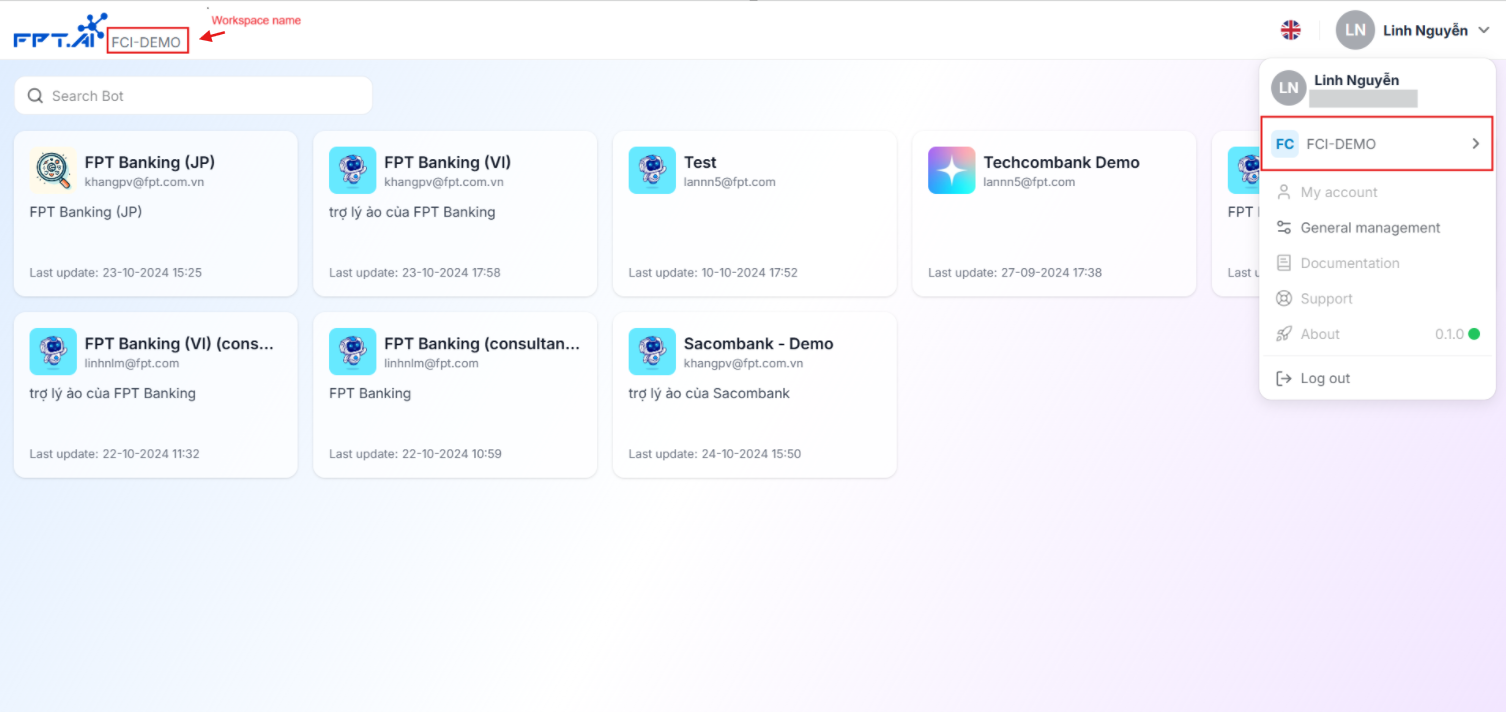
The workspace feature allows the system to support multiple customers using the same application while ensuring data independence and security. Each workspace represents a separate customer group or organization, with data and configuration managed separately.
If you do not have a workspace yet, please contact us to create a private workspace for yourself or your organization.
When the customer already has a workspace
Manage Users in Workspace
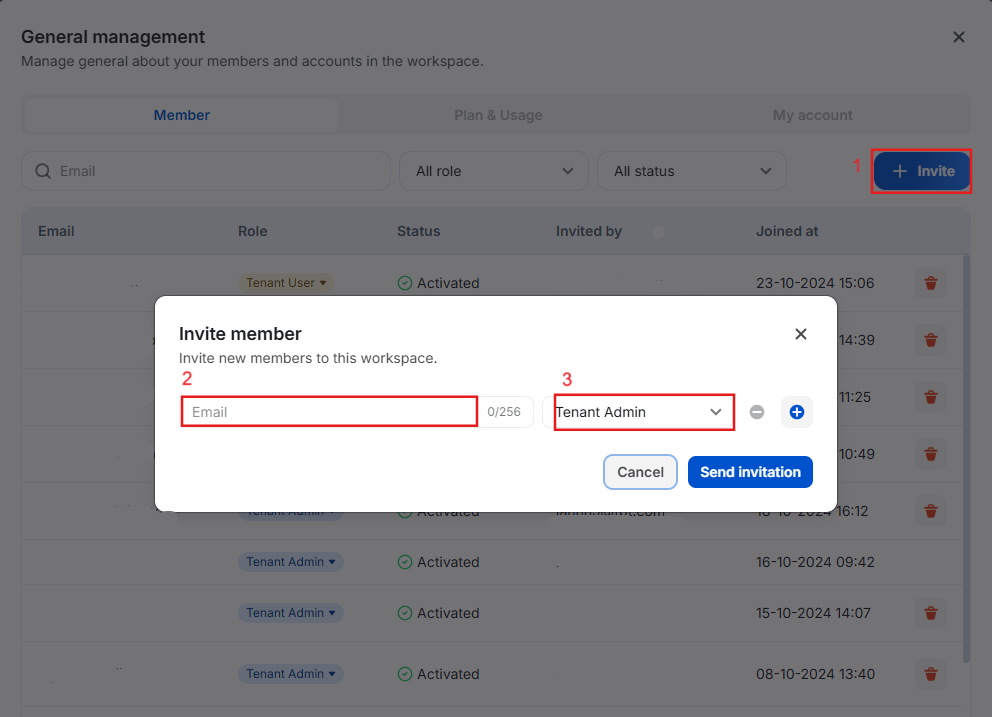
Invite users to the workspace.
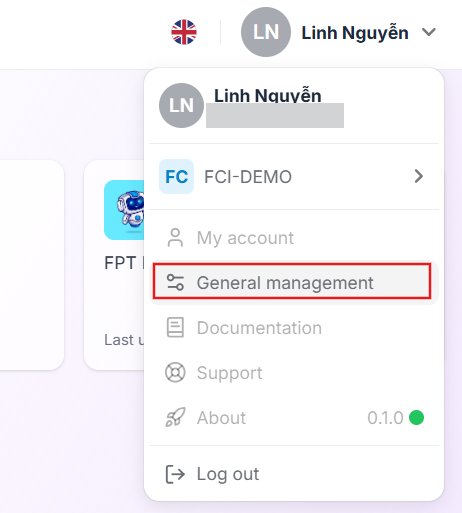
Step 1: Click on the menu in the upper right corner and select General Management
 Step 2: Click on the Invite button
Step 3: Enter Email and select User Role in workspace
Step 4: Click the "Send invitation" button
Step 2: Click on the Invite button
Step 3: Enter Email and select User Role in workspace
Step 4: Click the "Send invitation" button
Edit user roles in the workspace:
Step 1: Go to General Management screen Step 2: In the user list, search by email. Changing the user role, the system will automatically save the change information.
Delete a user in the workspace:
Step 1: Go to General Management screen Step 2: In the list of users, search by email. Click the Delete button. Step 3: Confirm member deletion The permissions table shows the roles that have access in the workspace:
| Function | Workspace Management | Regular Users |
|---|---|---|
| User Management (Add, Delete, Edit) | Have the right to add, delete, and edit all users in the workspace. | No user management rights. |
| AI Agent Management | Manage all AI Agents in the workspace. | Only AI Agents assigned to specific roles have permissions. |
Member Management in AI Agent
The AI Agent setup and management team can consist of multiple members, and each person can take on a different role.
The permissions table shows the roles that have access to the following features:
| Classify | Features | AI Agent Management |
|---|---|---|
| Set up AI Agent | Persona & Guideline | ☑ |
| Task Agents | ☑ | |
| List of operations | ☑ | |
| Tools | ☑ | |
| Guardrails | ☑ | |
| Chat optimization | ☑ | |
| Conversation history | ☑ | |
| Member | ☑ | |
| Deployment | Channel Integration | ☑ |
| Version management | ☑ |
To assign roles on AI Agent, follow these steps:
Step 1: Access AI Agent and go to "Members"
Step 2: Click on the Add button
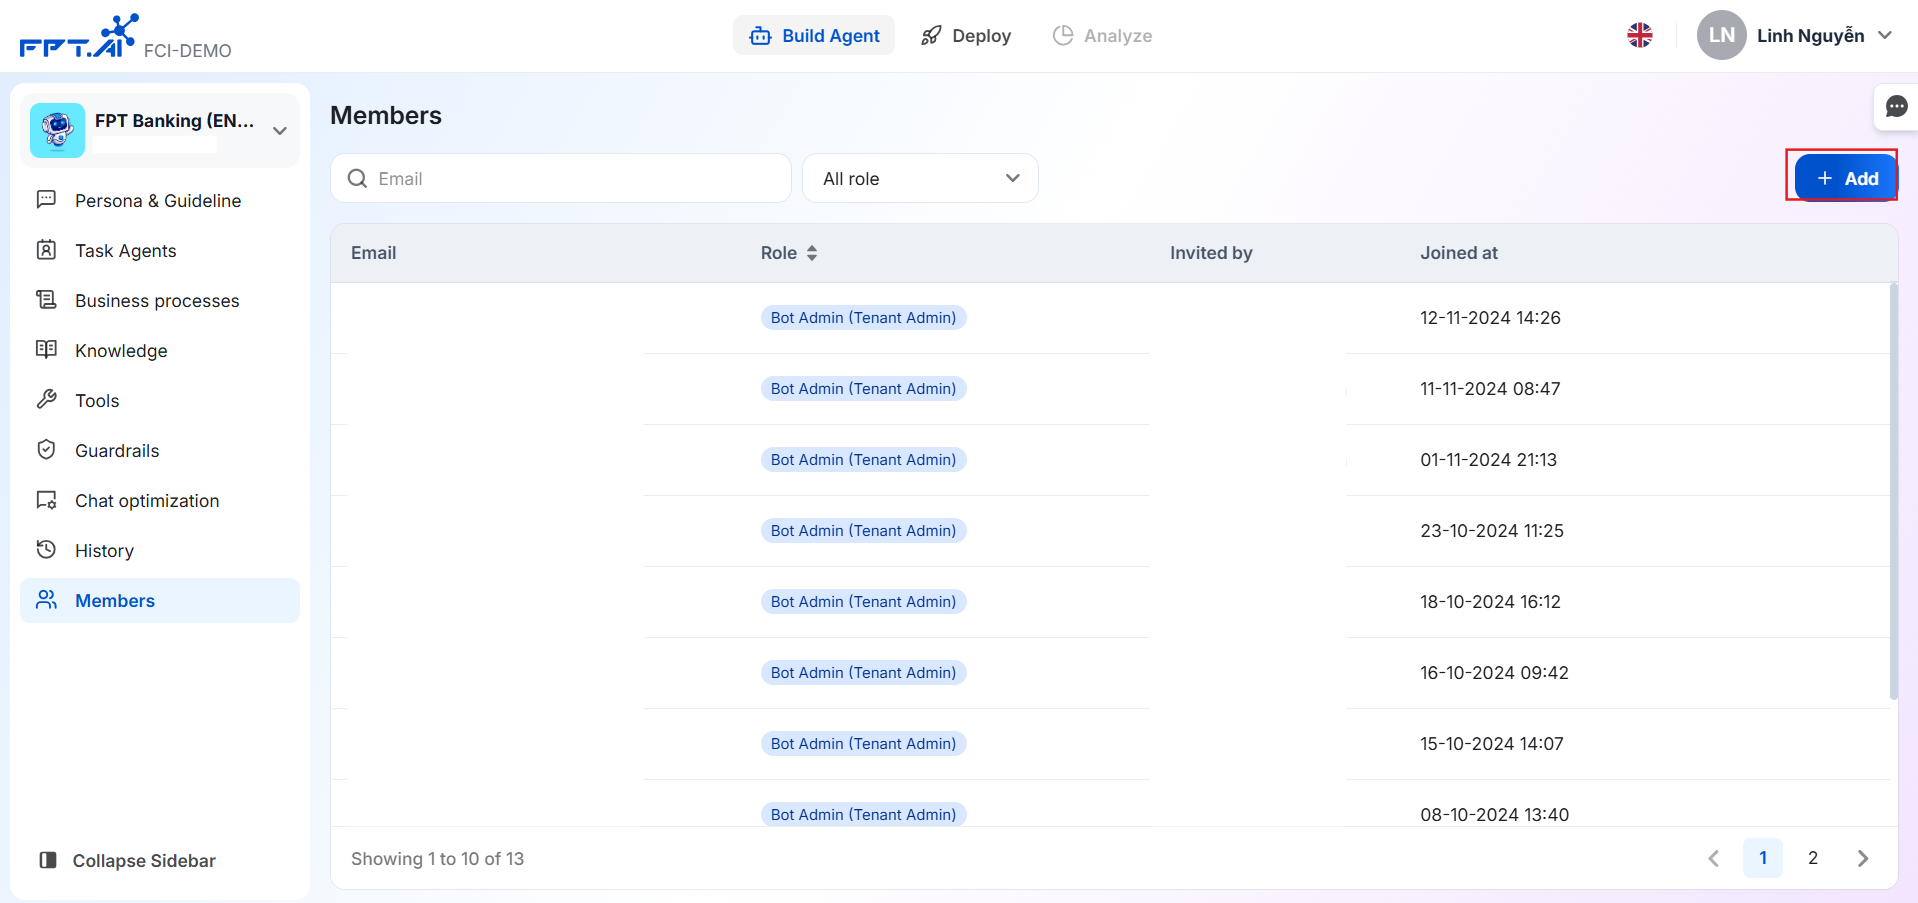
Step 3: Enter email and select user role. Note that you can only select emails in the same workspace. Click the "Add to Agent" button
