Documentation

Documentation

  • Conversation
  • Reader
  • Speech
  • Console
  • AI Agents
  • Languages iconEnglish
    • Tiếng Việt
    • Janpanese

›II. Building Chatbot on FPT.AI Platform

Documentation

  • Overview
  • I. Chatbot Introduction

    • What is Chatbot
    • Chatbot's purposes
    • Popular types of Chatbot
    • Benefits of using FPT.AI Chatbot
    • Starting with FPT.AI

    II. Building Chatbot on FPT.AI Platform

    • Working Mechanism
    • Bot building process
    • Creating your Chatbot
    • Natural Language Processing - NLP
    • Answer scenarios
    • New Bot scenarios - Bot Builder
    • Answer cards
    • Step connecting buttons
    • Getting customer's information using Form cards
    • Variable settings and management
    • Variable condition review
    • Memories
    • Send/get information via JSON API card
    • Reminder
    • Advanced functions
    • Persistent menu

    III. History

    • History - Updating Bot knowledge

    IV. Multi-channel Integration

    • Integrate with Facebook
    • Integrate with Facebook at Work
    • Integrate with Viber
    • Integrate with Zalo
    • Integrate with website
    • Webhook

    V. Broadcast

    • Broadcast

    VI. Auto Comment

    • Auto comment on Facebook

    VII. Automation Test

    • Check base on testcases
    • Auto create testcases

    VIII. Analytics

    • Introduction
    • Number of user's requests
    • Top matched intents
    • Chat with Bot
    • Number of new users
    • Top scenarios
    • Number of messages bot answered
    • Number of user's requests per hour
    • Number of active users per hour
    • Real-time analytics
    • Broadcast report

    X. Rating and Survey

    • Rating
    • Survey

    XI. Bot Setting - Management

    • Introduction
    • Bot information
    • Messages management
    • Data management
    • Bot intent confidence
    • Delete Bot data
    • Delete bot
    • Transfer bot ownership
    • Version

    XII. Bot Roles

    • Bot roles

    XIII. Chatbot SDK

    • Chat Bot SDK
  • Appendices

Live Support

  • Introduction
  • Customer list interface
  • Customer support flow
  • Note feature
  • Suppoter chat
  • KPI report feature
  • Ticket config
  • Ticket report
  • Archive conversation
  • Ticket management
  • Auto assign to supporters

Tutorials (Videos)

  • 1. Brief overview of FPT.AI
  • 2. Using QnA feature to create a Chatbot
  • 3. Creating Chatbot with complicated scenarios
  • 4. Precondition fucntion in Scenarios
  • 5. Random answer function in Scenarios
  • 6. NLP feature
  • 7. Exact match and Predictive Match in NLP
  • 8. History of Recognition
  • 9. Broadcast feature
  • 10. Live Support feature
  • 11. Persistent Menu
  • 12. Auto-comment feature on Facebook
  • 13. Bot roles
  • 14. Bot configuration in Settings section
  • 15. Integration Chatbot with Facebook
  • 16. Integration Chatbot with Facebook at Work

API Reference

  • Introduction
  • General
  • Natural Language Processing

    • Intent
    • Entity
    • Sample
    • Train
    • Predict
    • Keyword
    • Dictionary

    Dialogue Management

    • Get Answer
    • JSON Card
    • Types of the message

Building Chatbot on FPT.AI platform

Step connecting buttons

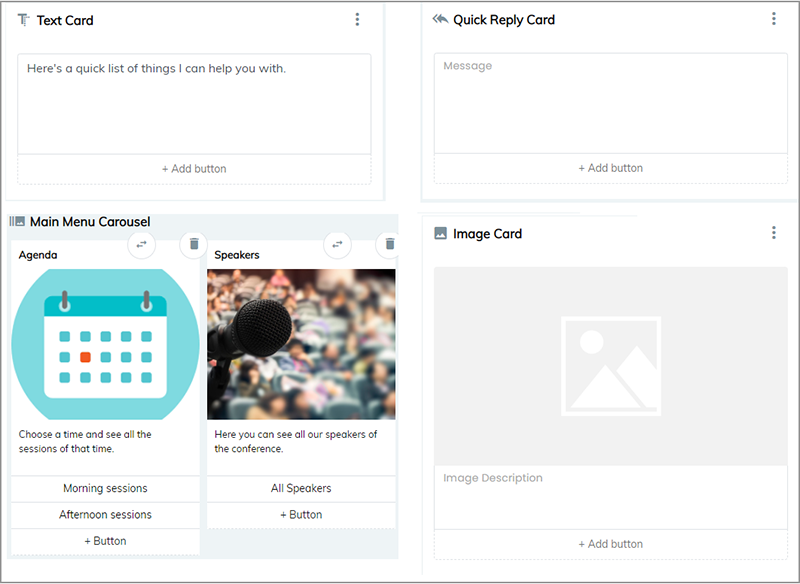
Bot builders can utilize Buttons as shortcuts, to help users quickly make correct decisions, and the conversations can thus be redirected to another Step, or another URL/phonecall.

Buttons are often attached to answer cards like Text Card, Image Card, Carousel, with the maximum quantity of 3. However, Quick Reply can allow up to 13 buttons.

1

Create Buttons

Step 1: Click Add button at the bottom of answer cards.

Step 2: Choose the Function that the you want the button to redirect to. Each function will require difference information particular to the button configuration.

  • Go to Step: allows redirection to 1 Step in the scenario, by: Choosing Go to Step > Enter Button name > Choose Action as step to be redirected to in scenario.

2

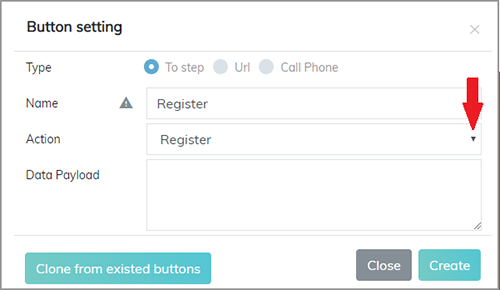
Attached data: Here you can set variables using the below syntax, so that when customers click on the button, the system will attach values to the variables.

{  
    "set_attributes": {  
        "variable name": "value"  
    }  
}
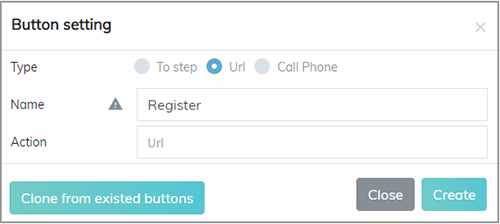
  • Go to URL: allows redirection to 1 URL

Choose Go to Step -> Enter Button name > Enter URL link to be redirected to in Action

3

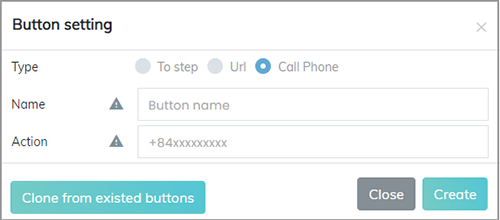
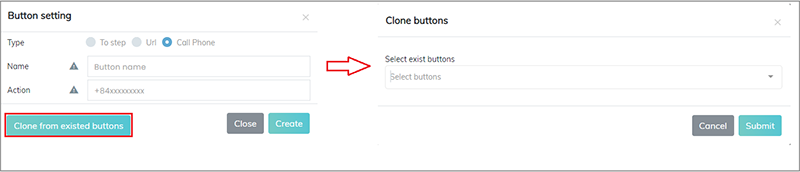
  • Phone call: This function will work for users who interact via mobile phones, and can enable redirection to the Phone call window on users’ mobiles.

Choose Phone call -> Enter Button name > Enter Phone number you want to call in Action in +84xxxxxxxx format

4

Step 3: Select Create to create Button, or Close to cancel creating new Button.

The Copy existing button function includes Buttons already created in the scenario, which allows creation of new Buttons with settings similar to previous ones. To do this, press Copy existing button > Choose the button you want to copy from > Select Confirm.

5

Edit button

To edit a button, go to Scenarios, then to the card that includes the button that needs editing. Then, in Button configuration, you can edit data fields, and click Update to save changes.

Delete button

To delete a Button, go to Scenarios, then to the card with the button that needs to be deleted, and select Delete to permanently delete the button. A deleted button cannot be recovered.

← Answer cardsGetting customer's information using Form cards →
  • Create Buttons
  • Edit button
  • Delete button
Conversation
DocumentationAPI ReferenceTutorials (Video)
Reader
DocumentationAPI ReferenceTutorials
Speech
DocumentationAPI ReferenceTutorials
Copyright © 2025 FPT Corporation